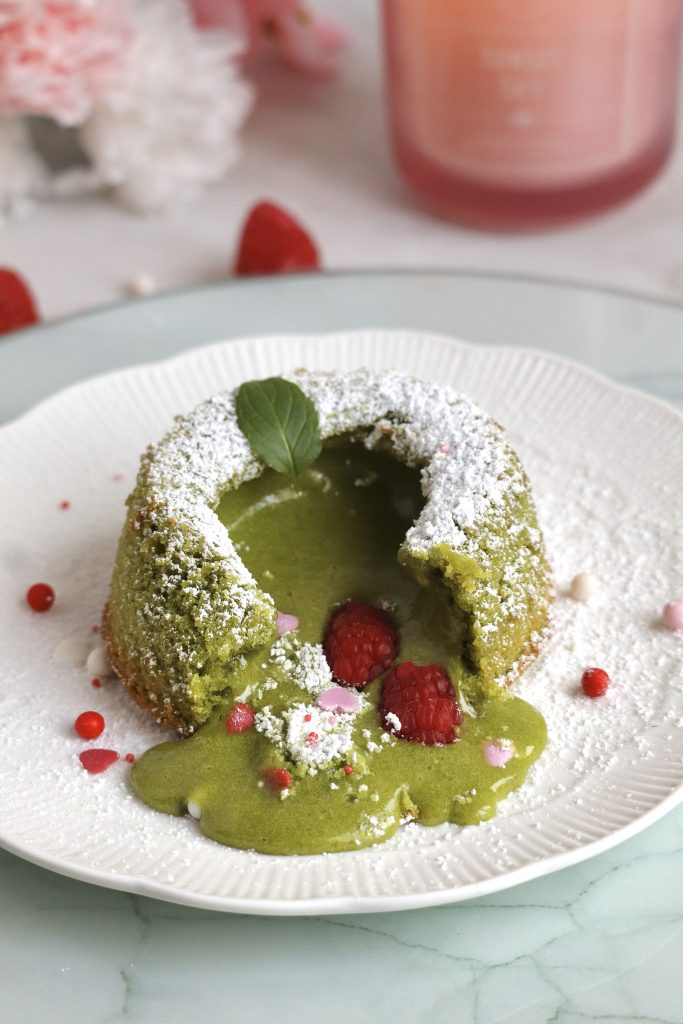

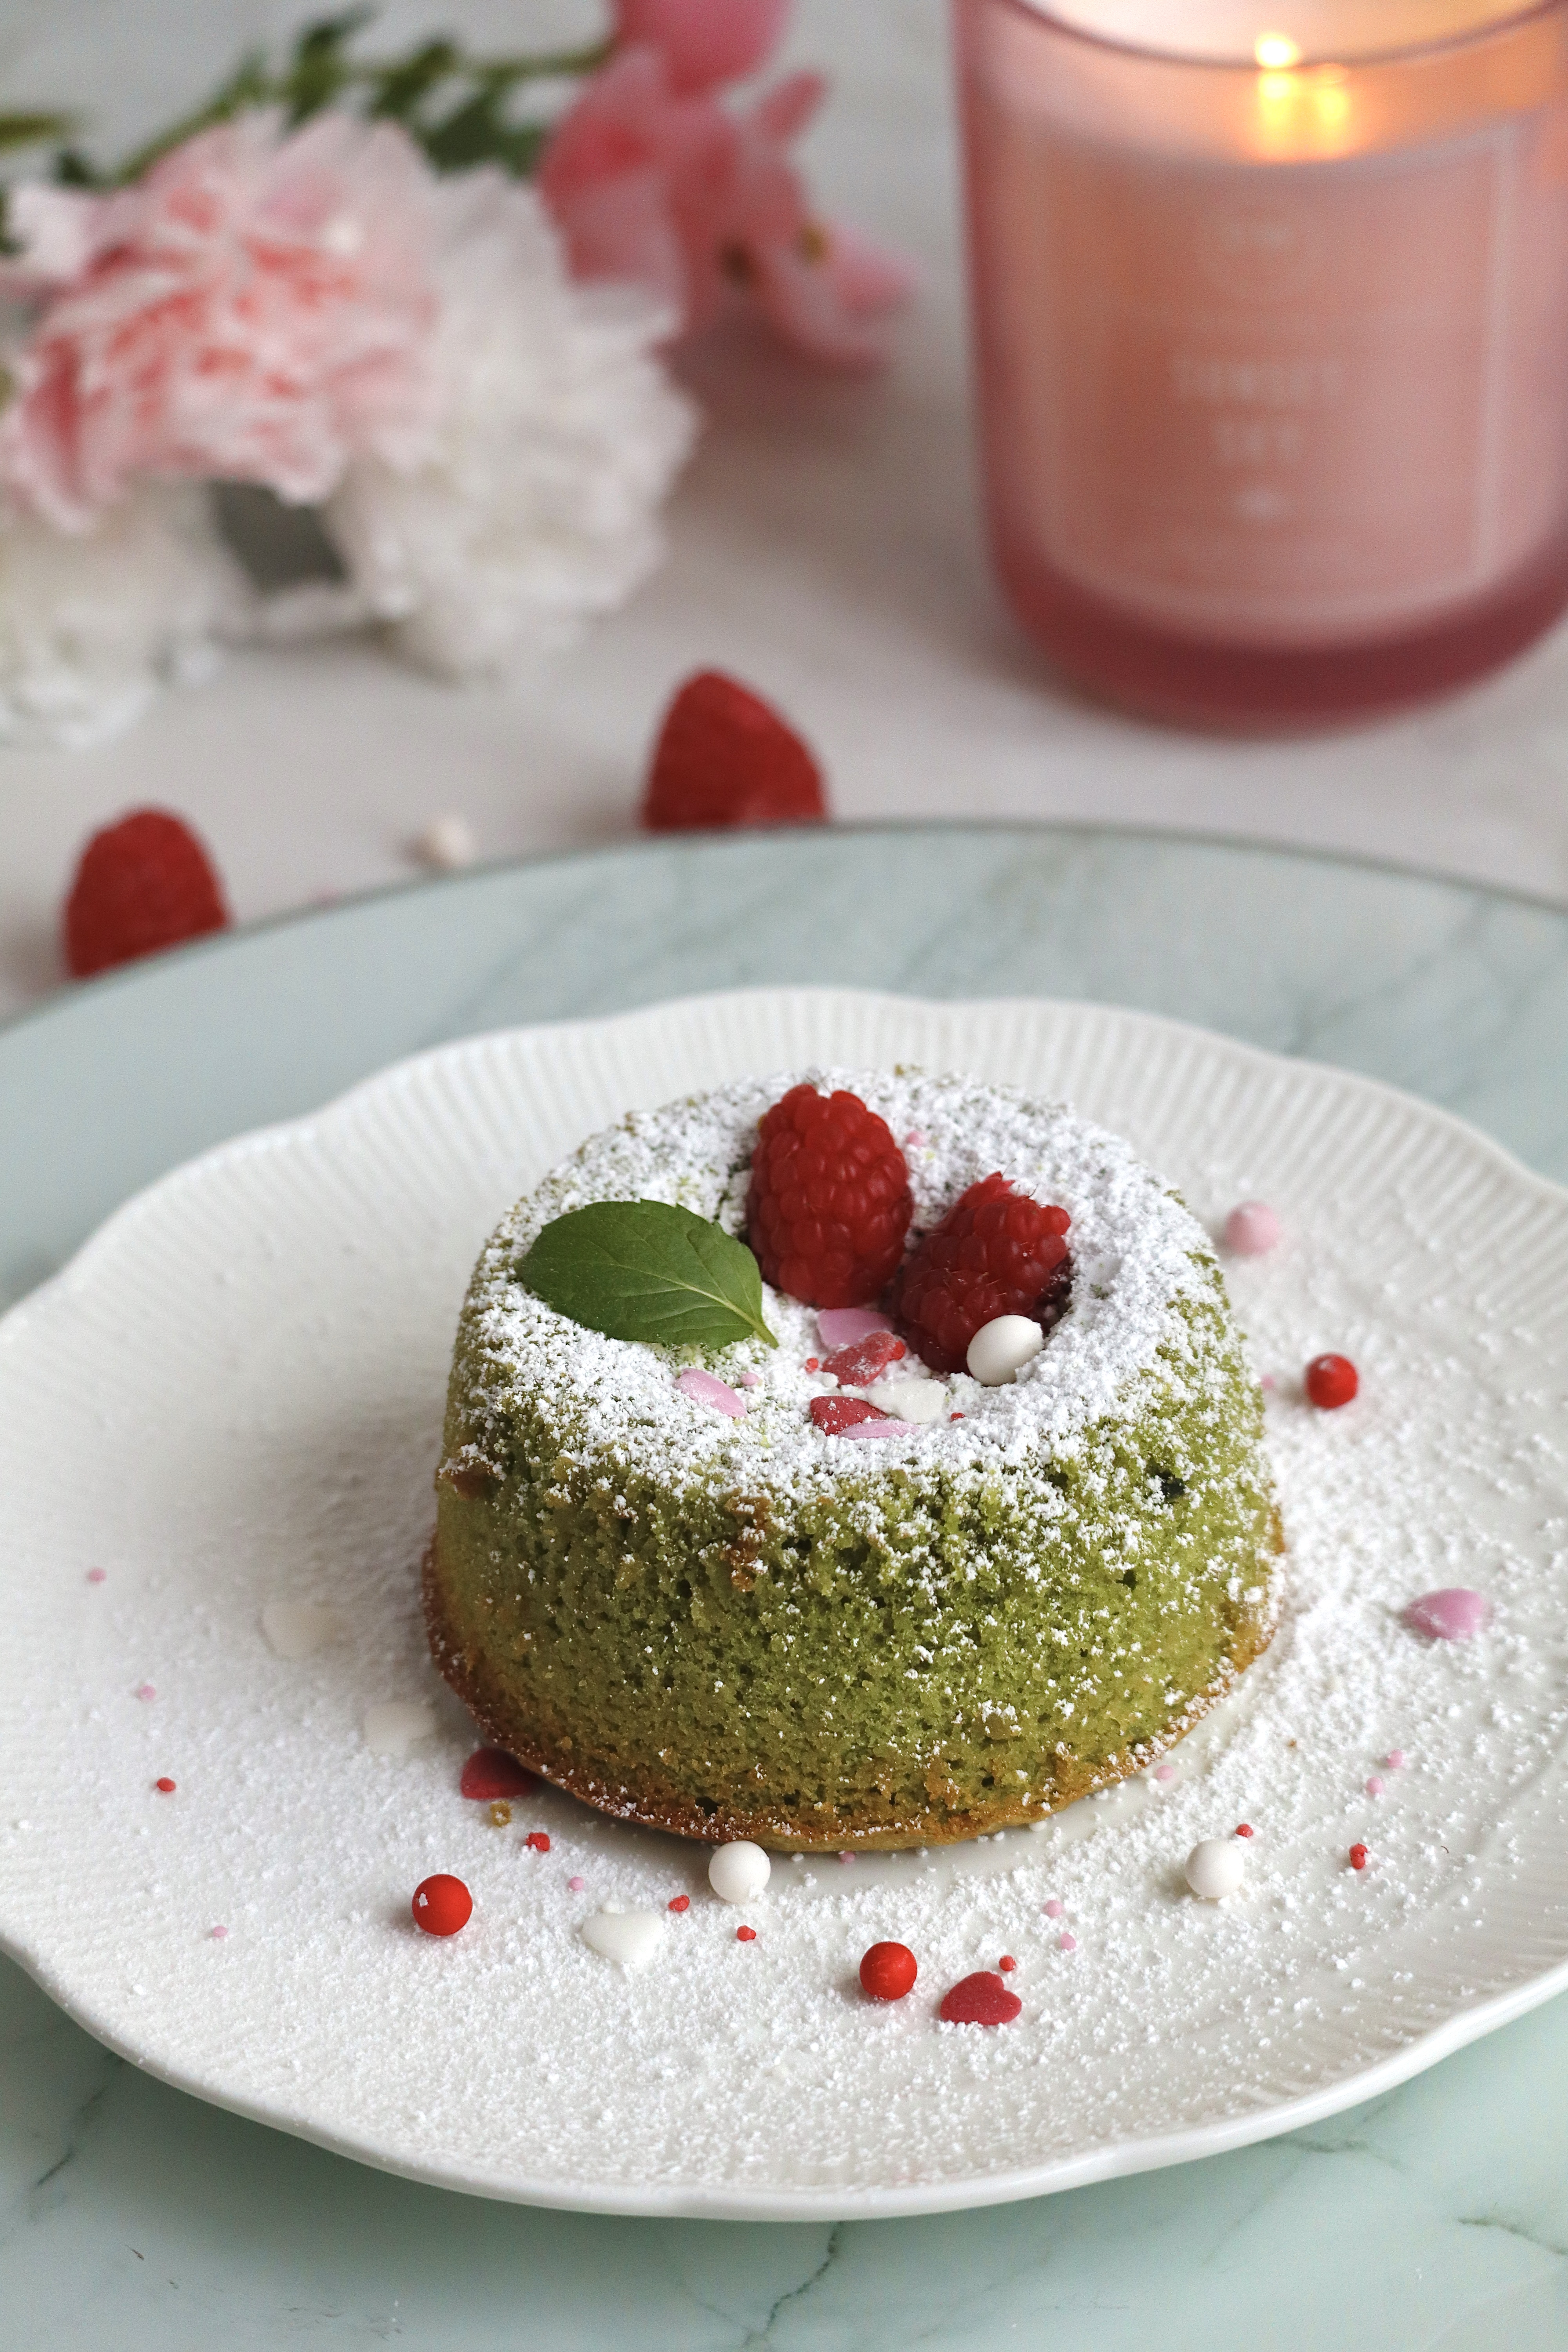
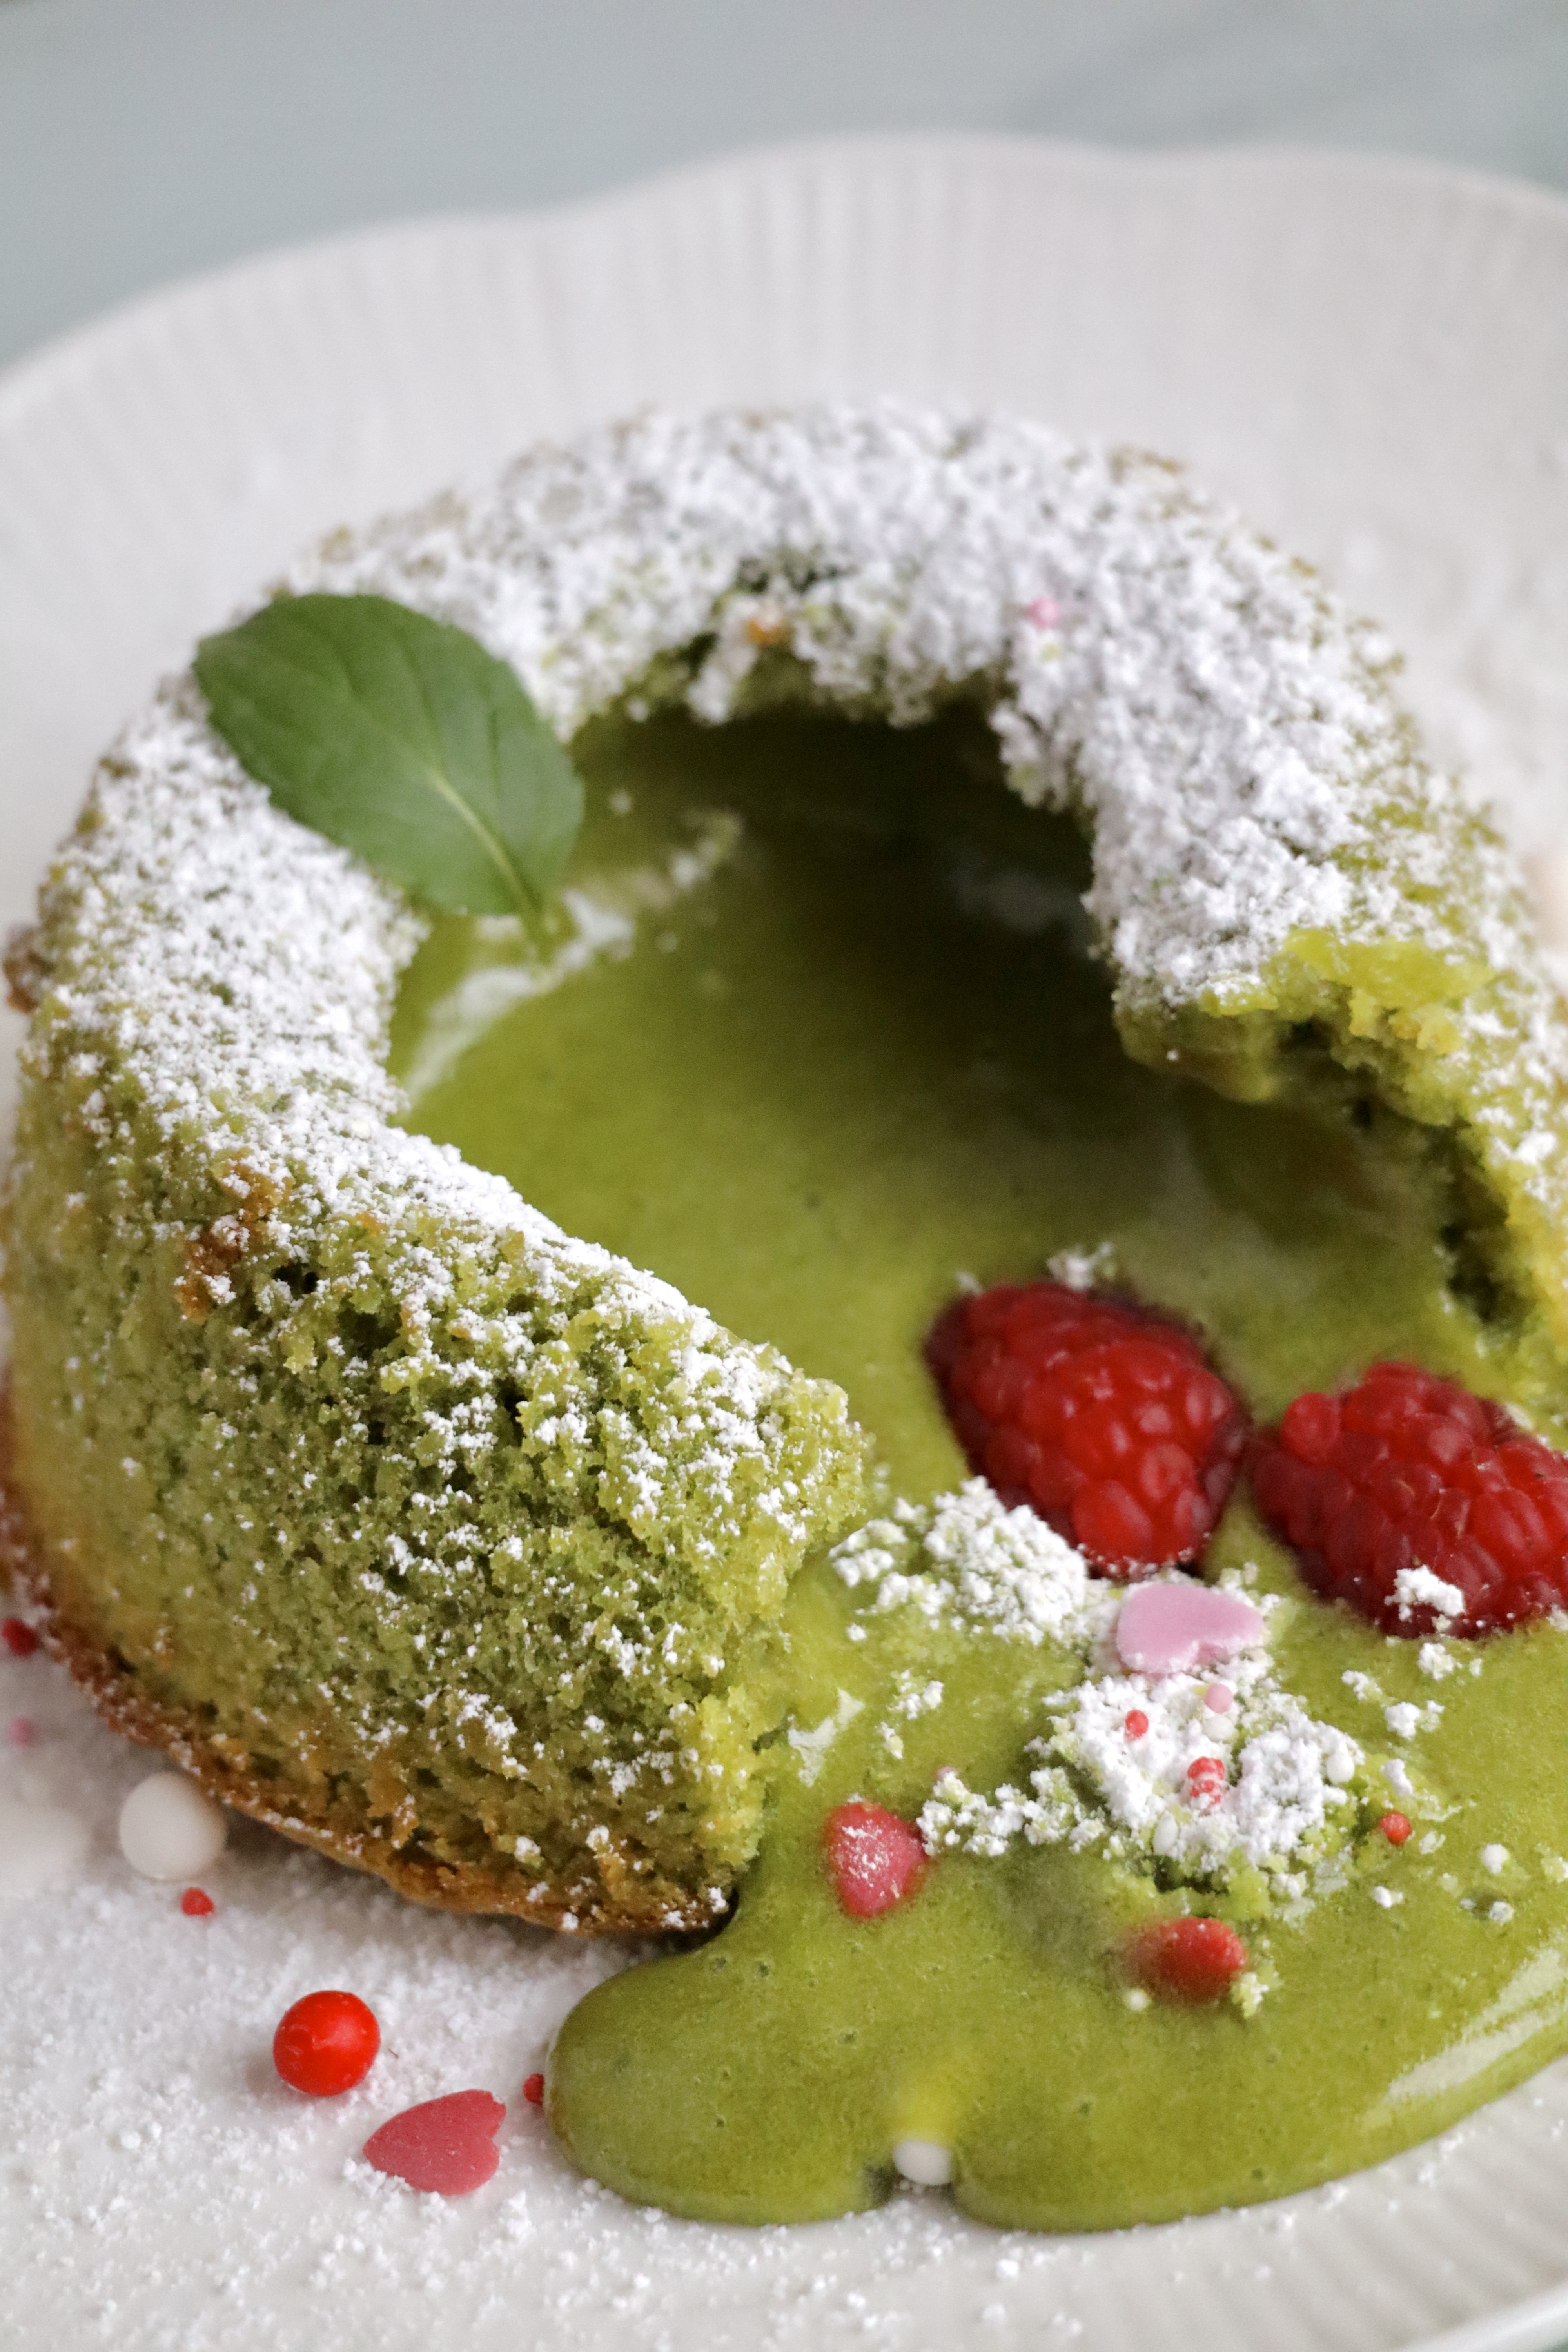
If you’re a fan of rich, molten chocolate cakes and the earthy, umami flavor of matcha, then you’re in for a treat. These Matcha Lava Cakes combine the best of both worlds – silky white chocolate with a fragrant matcha center that oozes out beautifully when you cut into it.
In this blog post, I’ll guide you through an easy-to-follow recipe for Matcha Lava Cakes for Two, ensuring perfect results every time. Plus, I’ll share some expert baking tips. Whether you’re making these for a romantic date night or simply treating yourself, this dessert is bound to impress!
Why You’ll Love This Matcha Lava Cake
- Quick & Easy: Ready in under 30 minutes!
- Minimal Ingredients: Just six pantry staples.
- Perfect for Two: Ideal for a cozy dessert moment.
- Matcha Goodness: Packed with antioxidants and a rich, earthy flavor.

Ingredients You’ll Need for the Matcha Lava Cake:
- Sugar: Adds sweetness and helps create a light, airy texture in the egg mixture.
- Eggs: Provide structure, moisture, and contribute to the molten lava texture.
- White Chocolate: Gives the cake its creamy texture and mild sweetness.
- Unsalted Butter: Adds richness and makes the batter smooth.
- Matcha Powder: Infuses the cakes with a unique earthy flavor and vibrant green color.
- All-Purpose Flour: Provides structure and helps balance the molten center.
- Powdered Sugar: Used for dusting, adding a delicate sweetness and an elegant look.
- Berries: Offer a fresh, juicy contrast to the rich lava cake.
Here are the essential tools you’ll need for making the Matcha Lava Cake:
- Two Ramekins: To bake the lava cakes.
- Mixing Bowl: For combining the ingredients.
- Whisk or Fork: To mix the batter.
- Microwave-Safe Bowl: To melt the white chocolate and coconut oil.
- Piping Bag (or a plastic bag): To pipe the batter into the ramekins.
- Baking Sheet: To place the ramekins on for baking.
- Small Plates: For flipping and serving the lava cakes.
- Sifter: Optional, for dusting powdered sugar on top.
Here is the full Recipe:
Ingredients:
- 70g (⅓ cup) sugar
- 2 eggs
- 100g (3.5 oz) white chocolate
- 55g (4 tbsp) unsalted butter
- 1–2 tsp matcha powder
- 60g (½ cup) all-purpose flour
- Powdered sugar (for dusting)
- Berries (for serving)
Directions:
Step 1: Prepare the Egg Mixture
- In a mixing bowl, combine sugar and eggs. Using an electric mixer, beat the mixture until it becomes pale, thick, and fluffy. This step is crucial for creating a light, airy texture in your lava cakes.
Step 2: Melt the White Chocolate & Butter
- In a heatproof bowl, melt white chocolate and butter together. You can do this over a double boiler or in the microwave in short 15-second bursts, stirring in between to prevent burning.
- Once fully melted, sift in the matcha powder and stir well until you have a smooth, evenly colored mixture.
Step 3: Combine the Wet Ingredients
- Gradually pour the melted matcha-chocolate mixture into the fluffy egg mixture. Use a spatula or whisk to gently fold everything together.
Step 4: Add the Flour
- Sift the flour into the bowl and carefully fold it in using a spatula. Be gentle to keep as much air in the batter as possible—this helps maintain the soft, lava-like texture inside.
Step 5: Bake to Perfection
- Preheat your oven to 200°C (392°F). Grease two ramekins or oven-safe cups with butter and lightly dust them with flour to prevent sticking.
- Divide the batter evenly between the two ramekins and bake for 12–14 minutes. Keep an eye on them—overbaking will result in a fully set cake with no molten center! The edges should be set, but the middle should still jiggle slightly when you shake the ramekin.
Step 6: Cool & Serve
- Let the cakes cool for at least 10 minutes before flipping them onto plates. This resting period helps the lava settle without spilling out too quickly.
- Dust with powdered sugar, add fresh berries, and enjoy immediately!
Tips for the Perfect Lava Cake:
- Use High-Quality Matcha: A ceremonial or premium-grade matcha will give your lava cakes a vibrant green color and a smooth, rich flavor. Lower-quality matcha may taste bitter.
- Don’t Overmix the Batter: Gently fold in the flour to keep the batter airy. Overmixing can lead to dense cakes instead of a light, molten texture.
- Watch the Baking Time: Every oven is different! Start checking at the 12-minute mark to ensure you get that gooey, lava-like center.
- Grease the Ramekins Well: This makes it easier to flip the cakes out without breaking them.
- Customize the Flavors: Add a pinch of vanilla extract or a splash of coconut milk for extra depth.
Frequently Asked Questions (FAQ)
1. Can I Make These Ahead of Time?
Yes! Prepare the batter and pour it into the ramekins, then refrigerate for up to 24 hours. Bake straight from the fridge but add 1–2 extra minutes to the baking time.
2. Can I Use Dark Chocolate Instead of White Chocolate?
Yes, but the flavor will be very different. White chocolate complements matcha’s delicate notes, whereas dark chocolate will add a more intense richness.
3. How Do I Know If My Lava Cakes Are Ready?
The edges should be set, but the center should still be slightly jiggly. If the cakes are too firm, they’ve been overbaked!
4. Can I Make This Recipe Gluten-Free?
Simply swap the all-purpose flour for almond flour or a 1:1 gluten-free flour blend.
More Recipes:
- Mini Protein Cheesecakes – These creamy and indulgent mini cheesecakes are packed with over 9g of protein per serving! Made with a graham cracker crust, Greek yogurt, and light cream cheese, they’re the perfect guilt-free dessert.
- Double Chocolate Protein Cookies -Soft, chewy, and loaded with chocolatey goodness, these cookies have a secret: chickpea flour and protein powder! Each bite is rich in flavor and protein.
- Healthy Peanut Butter Brownies – Fudgy, gooey, and swirled with creamy peanut butter—these brownies are paleo-friendly, refined sugar-free, and made with almond flour. A healthier spin on a classic treat!
- Strawberry Matcha Clusters – Sweet, tangy, and refreshing! These frozen yogurt clusters are coated in matcha white chocolate and sprinkled with strawberry powder for a vibrant, healthy snack.
Watch the recipe video here. Let’s get to baking! Here is the full recipe: