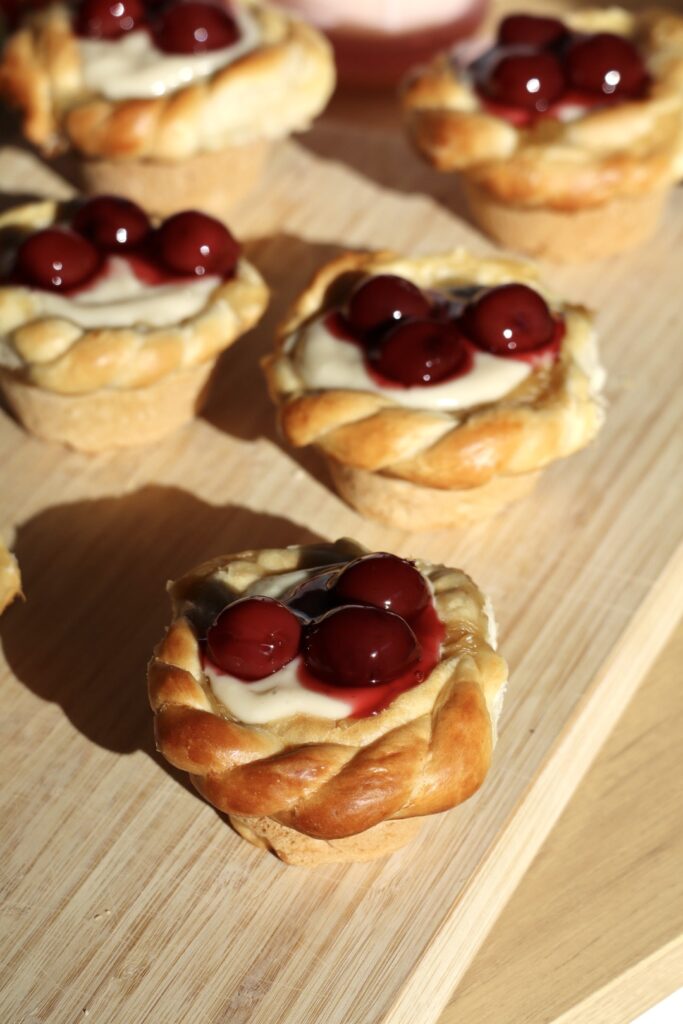

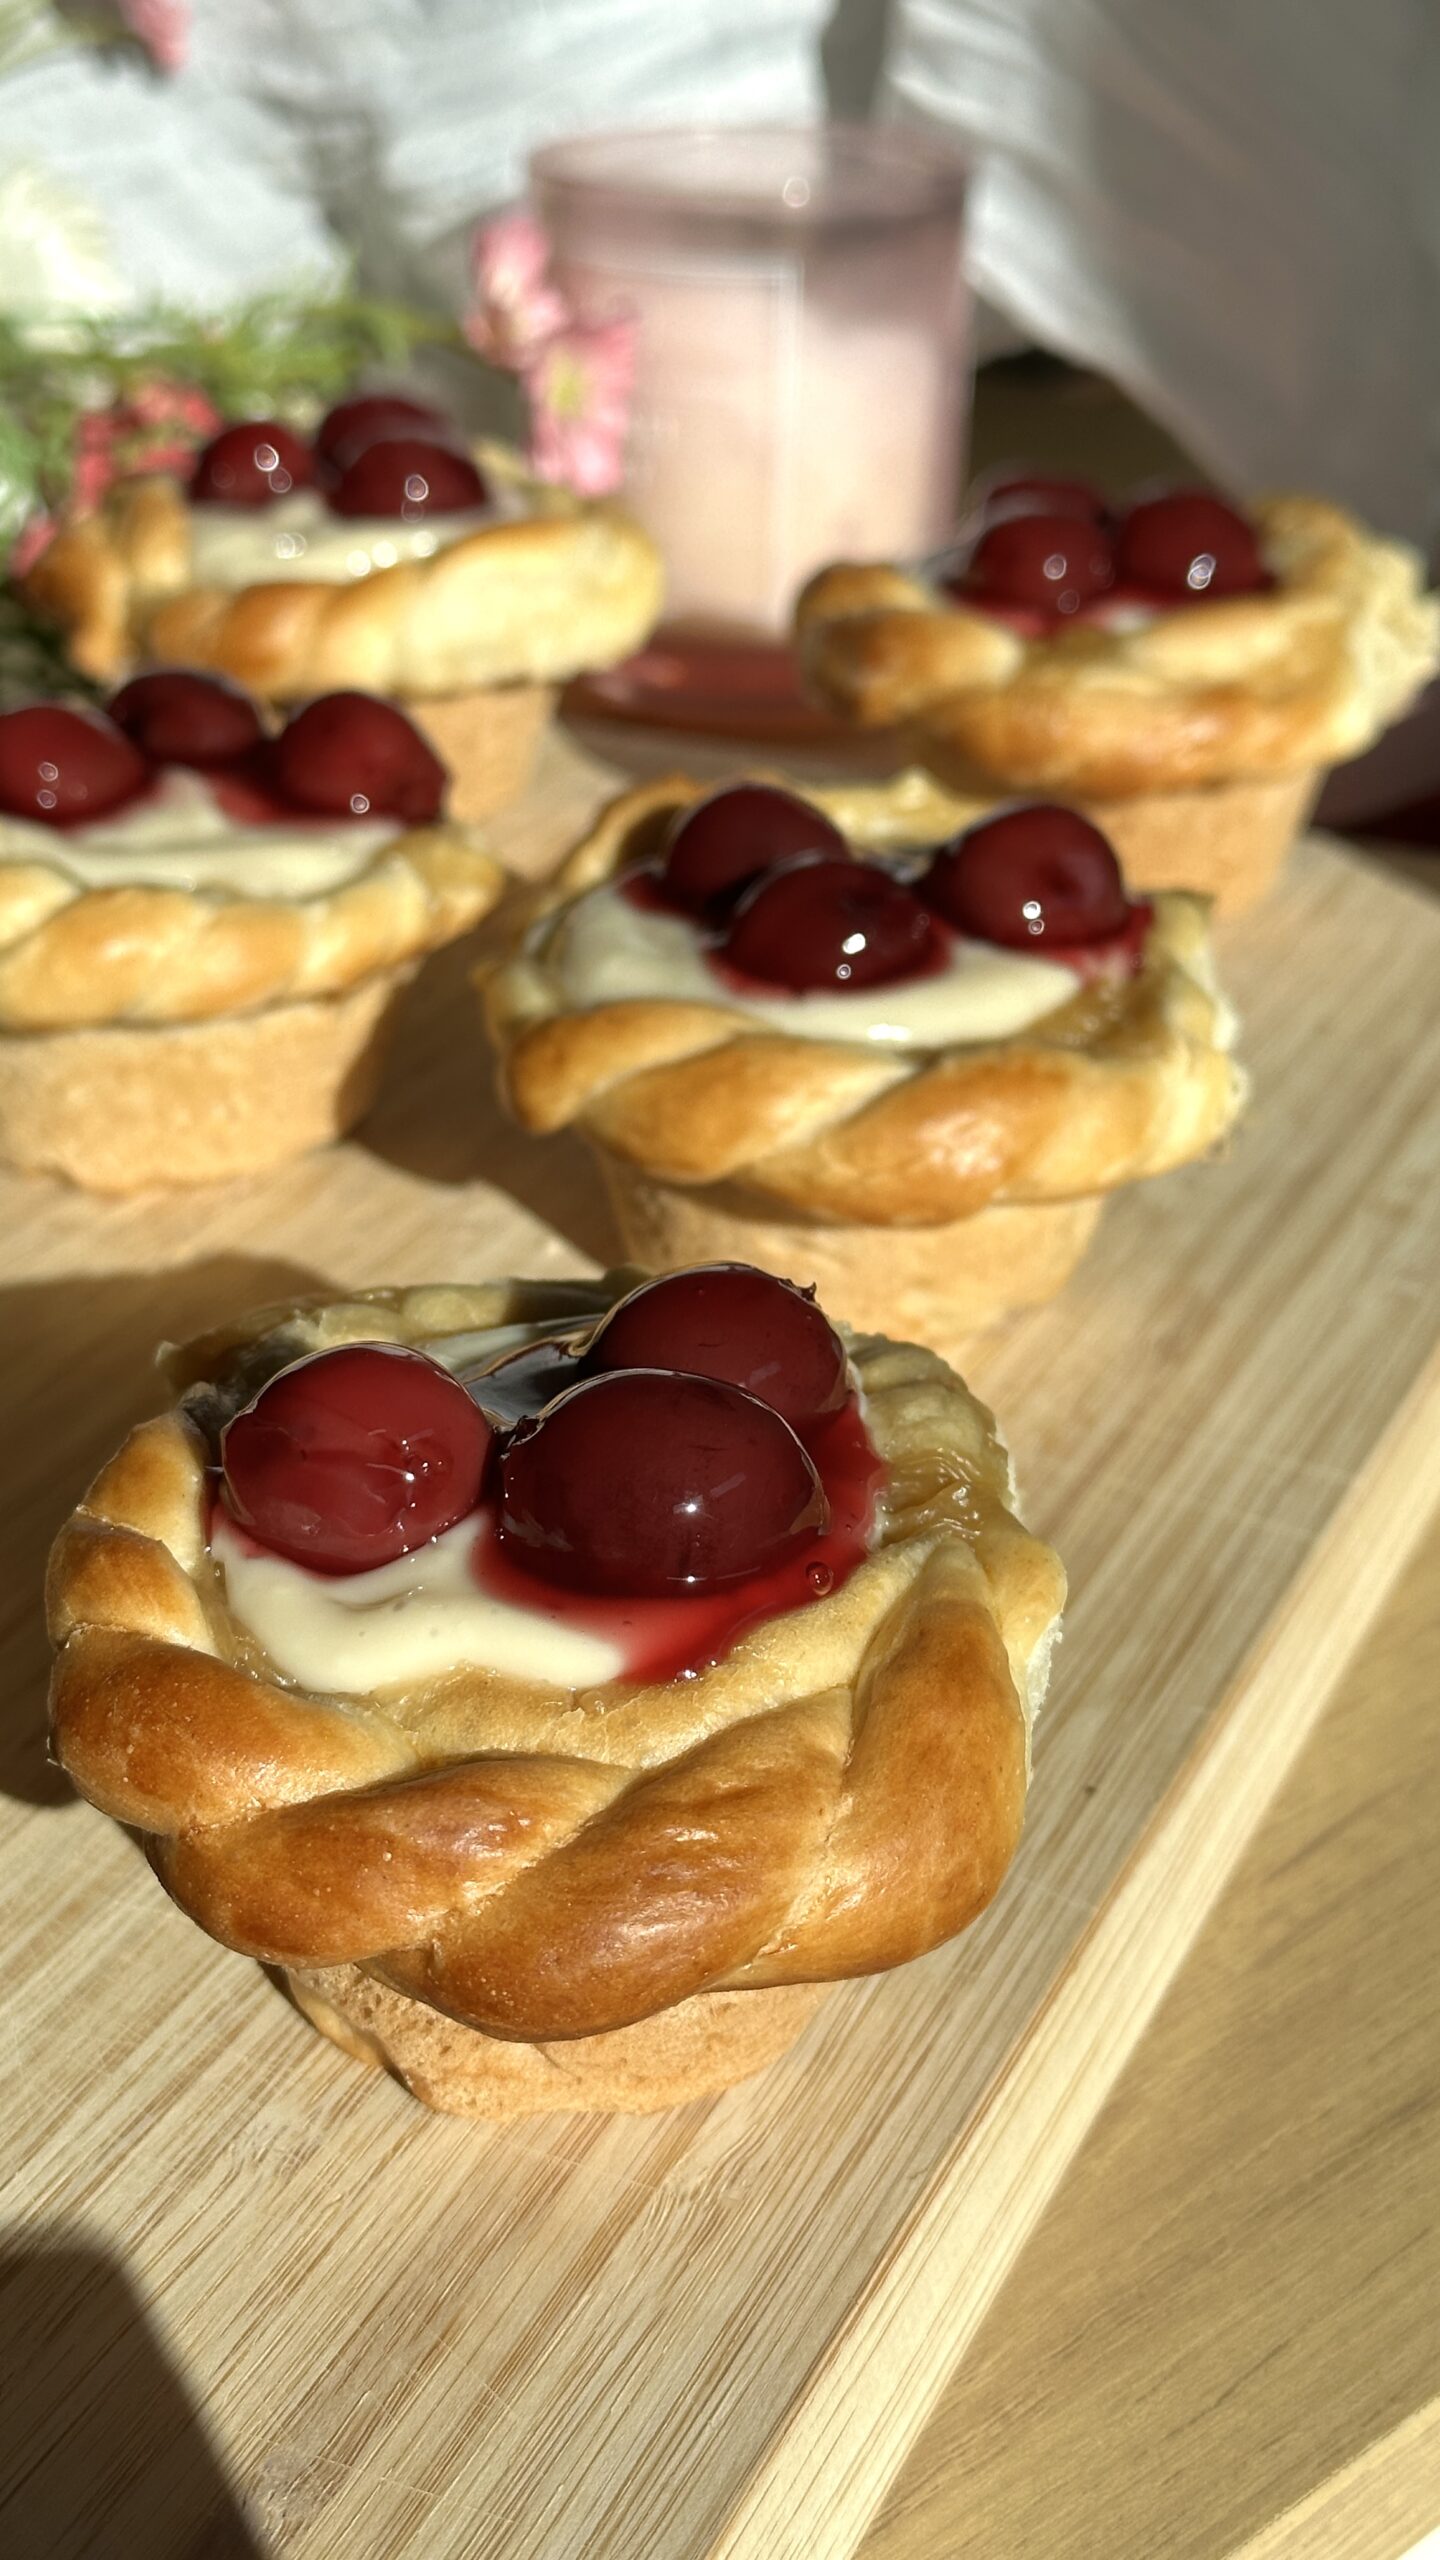
Soft yeast buns filled with vanilla custard and finished with cherries are a classic bakery-style pastry found across Central and Eastern Europe. Their appeal lies in the contrast between fluffy dough, creamy filling, and fresh fruit. While the concept is simple, the execution requires attention to structure, filling stability, and baking temperature.
This tutorial focuses on balanced dough hydration, a stable custard, and controlled oven spring, resulting in evenly baked buns with a flat, well-defined center suitable for custard and fruit toppings.

Why You’ll Love These Vanilla Custard Yeast Buns
- Balanced dough structure: The egg-free milk yeast dough stays soft and elastic while baking evenly under the filling, giving the buns a light crumb without collapsing or doming.
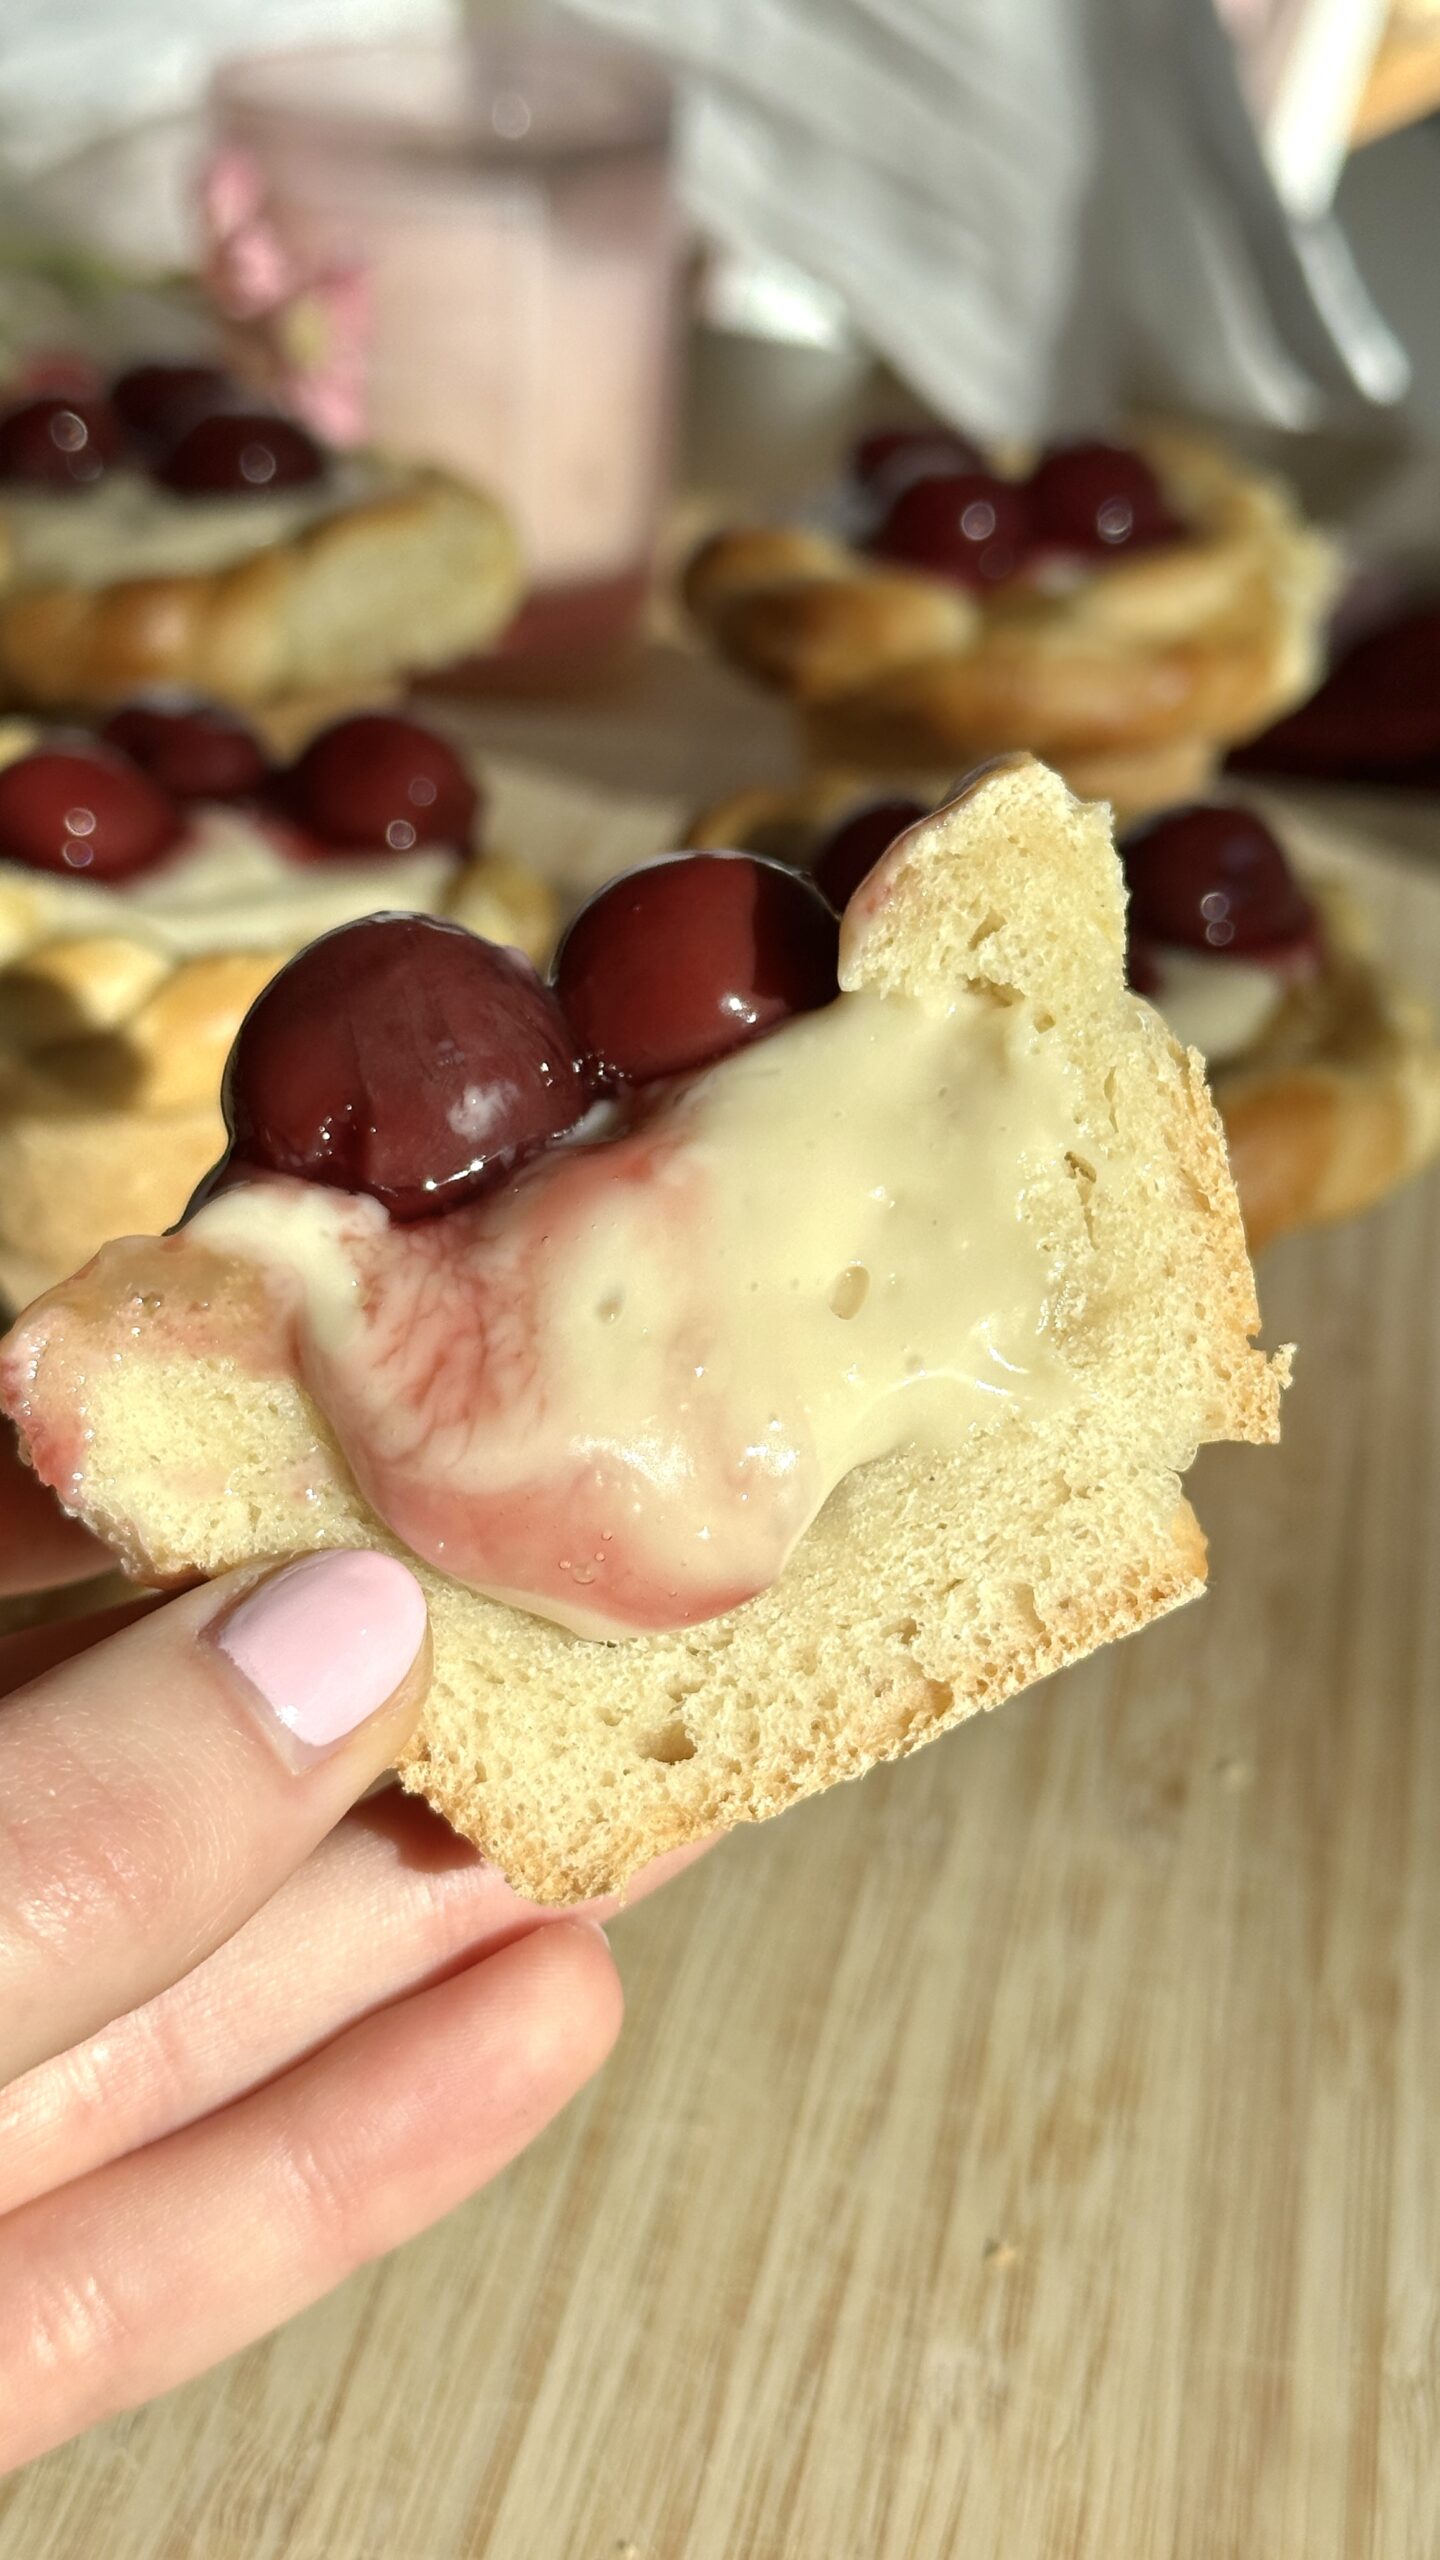
- Custard that holds its shape: The vanilla custard is cooked thick and slightly reinforced with starch, so it sets at the same pace as the dough and stays neatly in the center.
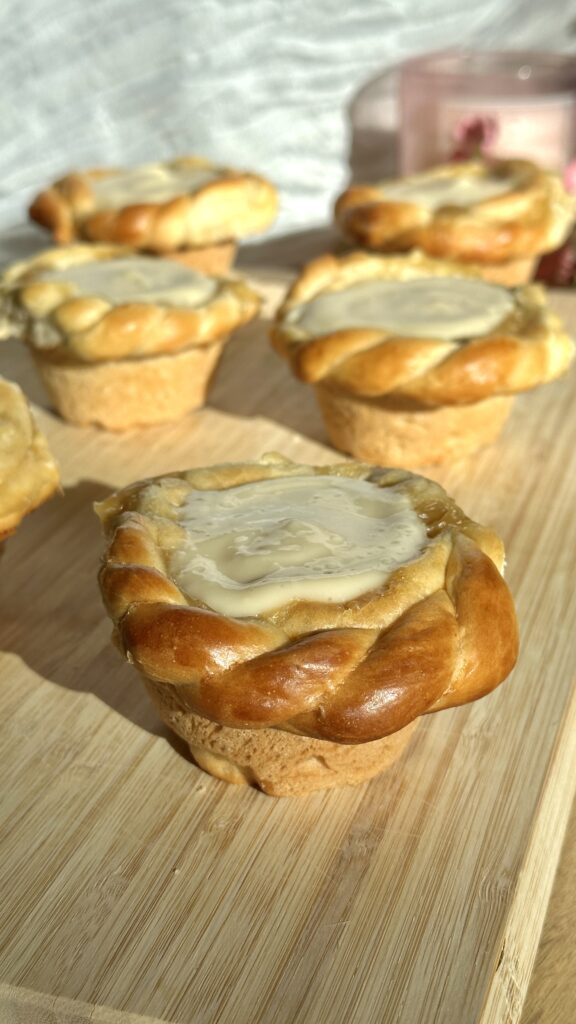
- Clear shaping and proofing guidance: Deep indentations, controlled final proofing, and muffin-pan support help the buns keep their defined shape from oven to cooling rack.
- Gentle baking temperature: A slightly lower oven temperature allows the dough beneath the filling to bake through before the tops overbrown.
- Flexible topping options: The baked custard center provides a stable base for cherries or other fruit toppings added after baking.
- Consistent, repeatable results: Precise ingredient ratios and weights make this recipe easy to reproduce with the same outcome each time.
Ingredients You’ll Need for the Buns
- Milk: Forms the liquid base of the dough, keeping it soft and tender while supporting even yeast activity.
- Sugar: Adds mild sweetness and helps activate the yeast while promoting gentle browning during baking.
- Fresh Yeast: Provides a steady, controlled rise and contributes to the dough’s light, airy structure.
- All-Purpose Flour: Creates the main structure of the buns, offering enough strength to support the custard filling without becoming dense.
- Butter: Adds richness and softness to the crumb while keeping the dough flexible during shaping and baking.
- Salt: Balances sweetness and strengthens the gluten structure for better dough stability.
- Milk (for custard): Acts as the base for the vanilla custard, giving it a smooth, creamy texture.
- Vanilla Pudding Powder: Thickens the custard and provides consistent vanilla flavor and structure.
- Cornstarch: Stabilizes the custard so it sets properly and holds its shape during baking.
- Cherries: Add freshness and gentle acidity, balancing the sweetness of the custard and dough.
- Sugar (for cherries): Enhances the natural fruit flavor and helps create a light glaze.
- Lemon Juice: Brightens the cherry topping and balances sweetness.
- Egg Yolk: Used for brushing the dough edges, contributing to color and a soft sheen.
- Milk (for egg wash): Lightens the egg wash so it coats evenly without hardening the crust.
For Making the Vanilla Custard Buns, Here Are the Essential Tools You’ll Need
- Mixing Bowl: Used for combining and kneading the dough ingredients until smooth and elastic.
- Kitchen Scale: Ensures consistent portioning of dough and filling for even baking results.
- Small Saucepan: Used to cook the vanilla custard and prepare the cherry topping.
- Whisk: Helps dissolve starch and pudding powder smoothly and prevents lumps in the custard.
- Wooden Spoon or Silicone Spatula: For stirring custard and fruit topping while cooking.
- Plastic Wrap: Placed directly on the custard surface to prevent a skin from forming while cooling.
- Muffin Pan: Provides structure and vertical support so the buns rise evenly and keep their shape.
- Pastry Brush: Used to apply egg wash neatly to the dough edges.
- Glass or Measuring Cup (Flat Bottom): Helps press a deep, even indentation into the dough centers.
- Wire Cooling Rack: Allows the buns to cool evenly without trapping moisture underneath.
- Aluminum Foil: Used to loosely cover the buns if they brown too quickly during baking.

Here is the full Recipe for the Vanilla Buns
Ingredients:
Yeast Dough
- 200 ml (¾ cup + 1 tbsp) milk, lukewarm
- 70 g (⅓ cup) sugar
- 12 g fresh yeast (or 4 g / 1¼ tsp instant yeast)
- 350 g (2¾ cups) all-purpose flour
- 40 g (3 tbsp) unsalted butter, very soft
- 2 g (⅓ tsp) salt
Vanilla Custard Filling
Option A – with vanilla pudding powder
- 400 ml (1⅔ cups) milk
- 1 packet vanilla pudding powder (≈ 37 g / 1.3 oz)
- 40–50 g (3–4 tbsp) sugar
- 1 tsp cornstarch (additional, important)
Option B – without pudding powder
- 400 ml (1⅔ cups) milk
- 35 g (¼ cup minus 1 tbsp) cornstarch
- 60 g (¼ cup + 1 tbsp) sugar
- 1 tsp vanilla extract
- 1 small pinch turmeric (optional) – only for color, not flavor
Cherry Topping (added after baking)
- 200 g (1½ cups, pitted) cherries
- 30–40 g sugar
- 1 tsp cornstarch
- 1 tsp lemon juice
Egg Wash
- 1 egg yolk
- 1 tbsp milk
Directions:
- Make the Dough
Warm the milk until lukewarm (35–38°C / 95–100°F). Stir in the sugar, crumble in the yeast, and mix until dissolved. Let stand 10–15 minutes until foamy.
Add flour, salt, and butter. Knead for 8–10 minutes until the dough is smooth, soft, and slightly tacky. Do not add excess flour.
Cover and let rise at room temperature for 90–120 minutes, until doubled. - Prepare the Custard
Option A (pudding powder):
Mix pudding powder, sugar, and cornstarch with a little cold milk. Bring remaining milk to a boil, add mixture, and cook while stirring until very thick.
Option B (no pudding powder):
Whisk cornstarch and sugar with a little cold milk until smooth. Bring remaining milk to a boil, add mixture, and cook until thick and glossy. Remove from heat and stir in vanilla extract.
For both versions:
Cover the surface directly with plastic wrap and chill until completely cold and firm. - Prepare the Cherry Topping
Combine cherries, sugar, cornstarch, and lemon juice in a small saucepan. Heat briefly until thickened and glossy. Cool completely. Set aside. - Shape the Buns
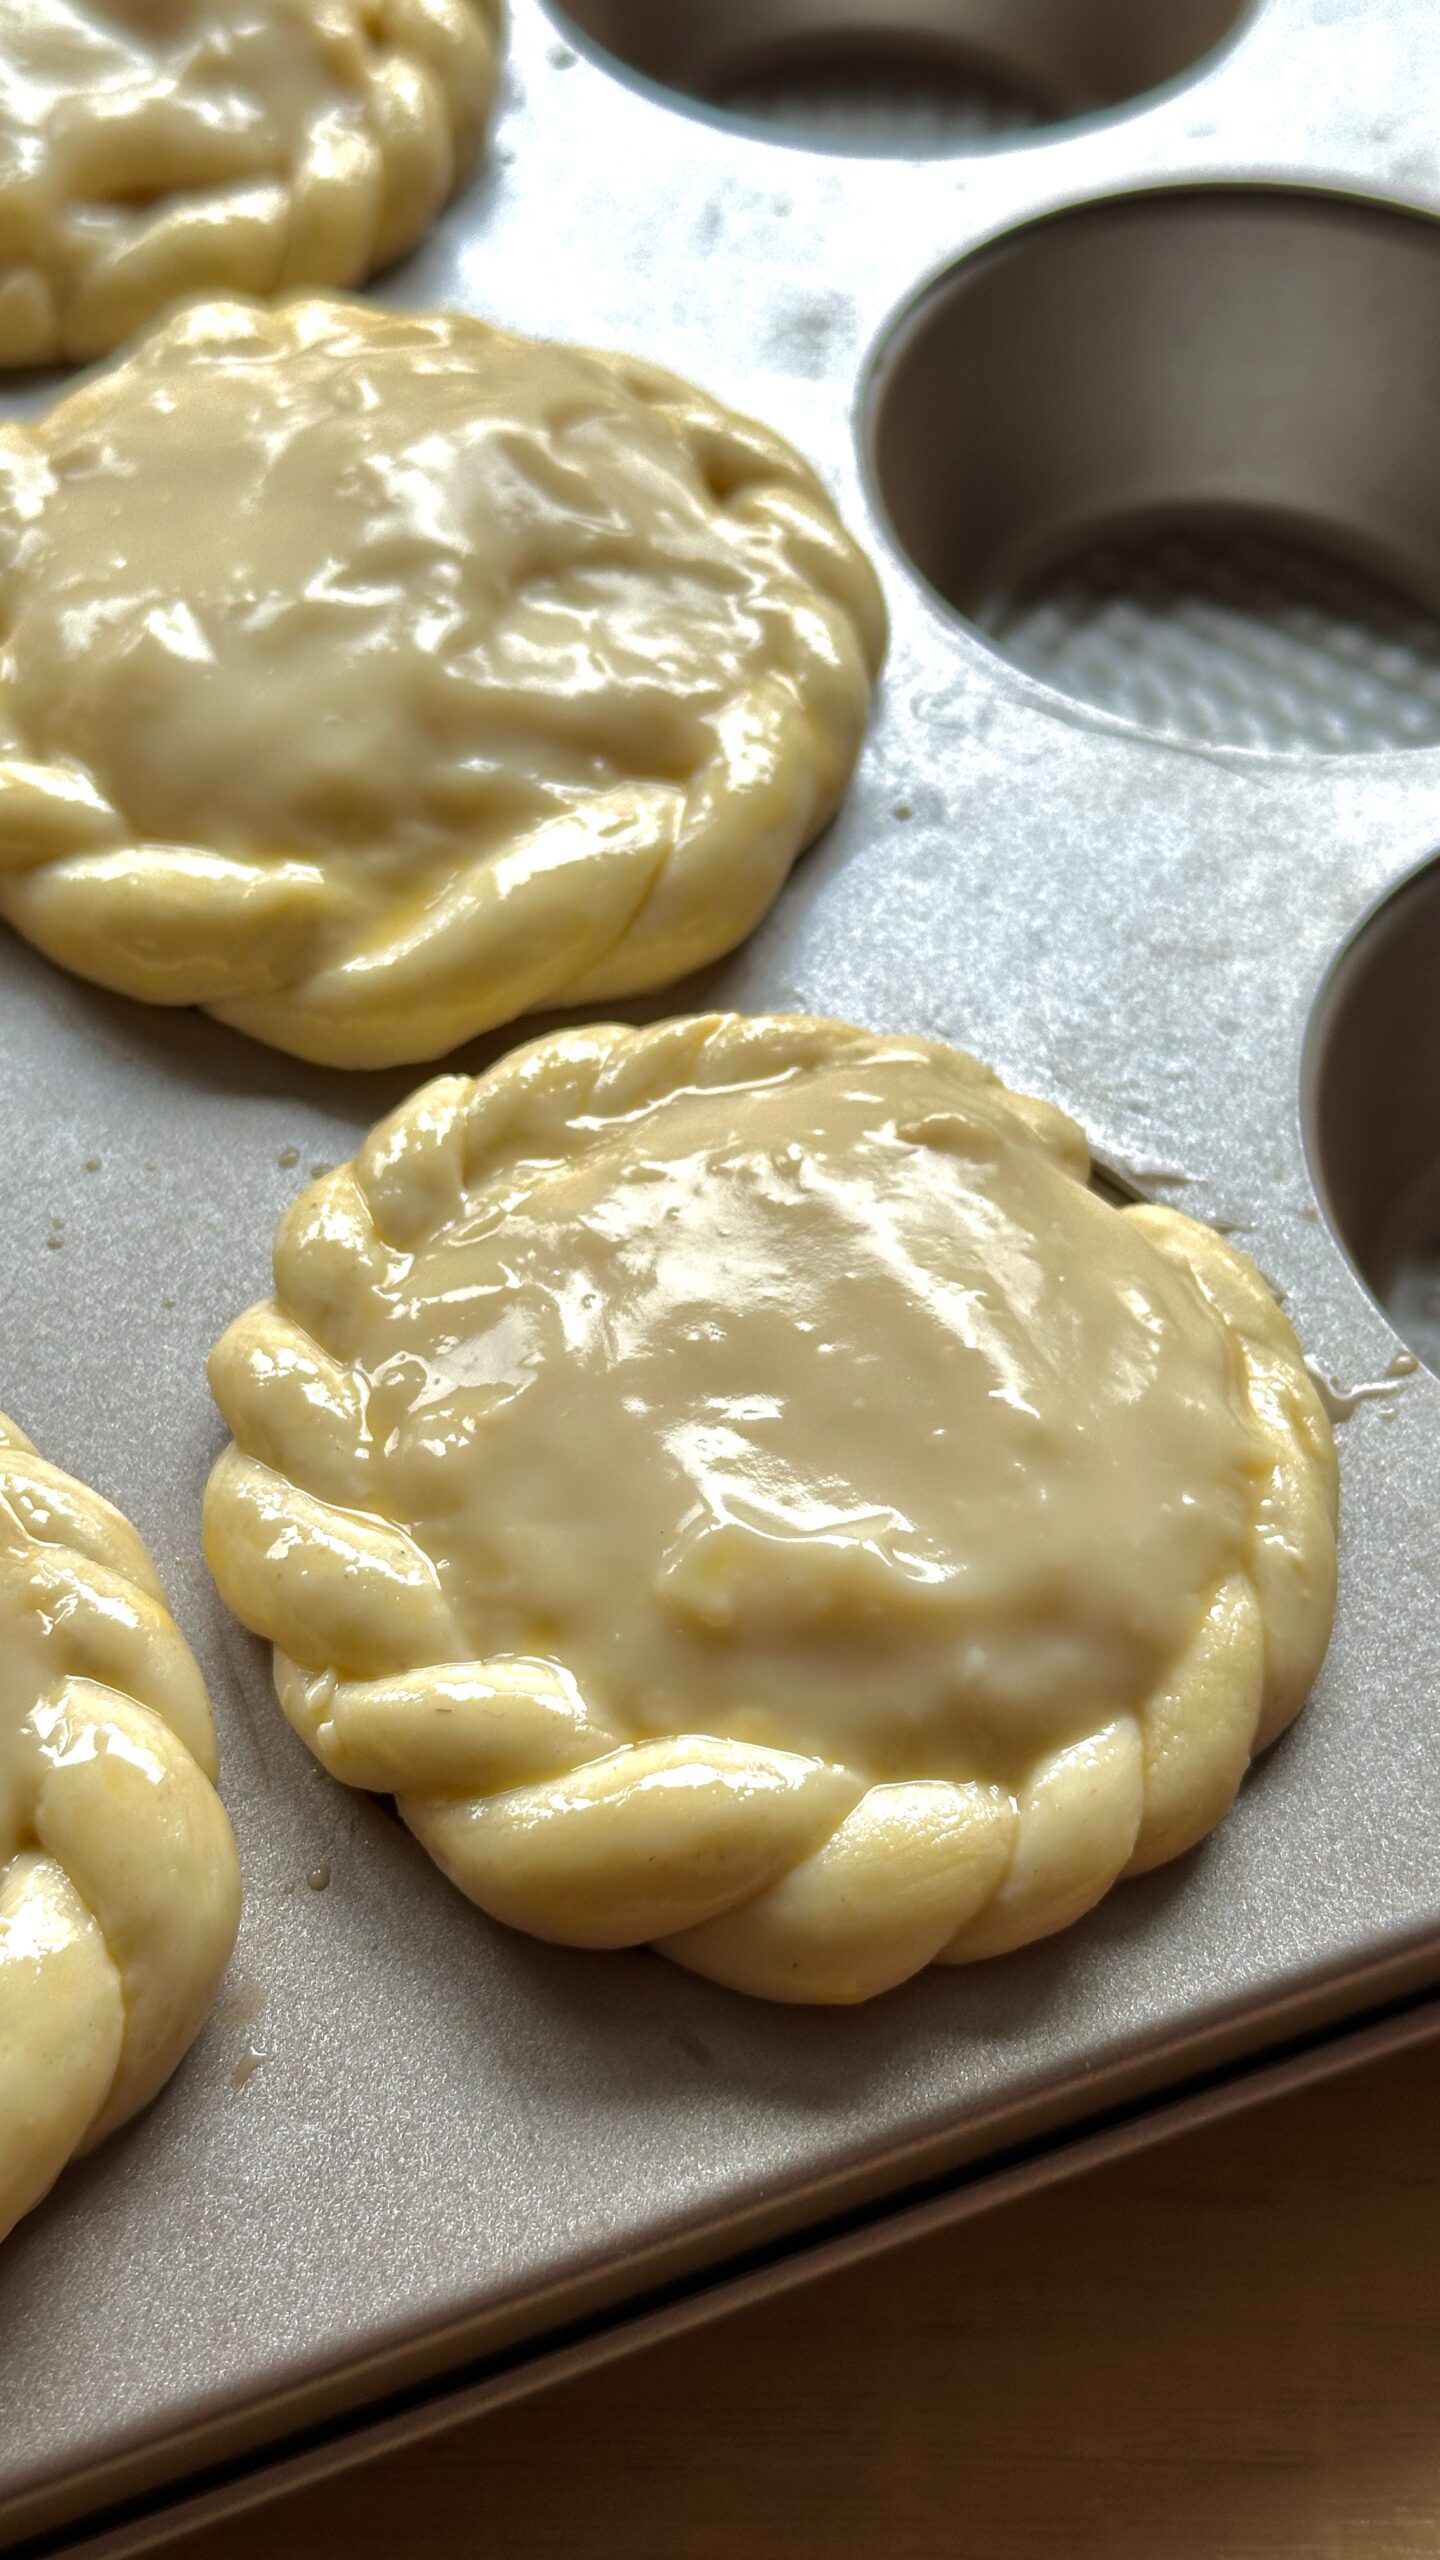
Punch down the dough and divide into 70–75 g portions (2½–2¾ oz). Shape into tight balls. To create the twisted edge, divide each dough portion into a main piece and two small strips, roll the strips into a thin rope, and gently twist and wrap it around the pressed dough base, overlapping the ends slightly to form a decorative border.
Generously grease a muffin pan with butter. Place one dough ball into each cavity.
Rest 10 minutes, then press a deep indentation into the center of each bun, almost to the metal. Wait 5 minutes and press again. - Fill
Spoon 1 heaping tablespoon (18–22 g) of cold custard into each indentation, filling about ¾ full. - Final Proof
Let the filled buns rise for 15–20 minutes only. - Bake
Brush only the dough edges with egg wash.
Bake at 160–165°C / 320–330°F for 22–25 minutes.
If browning too quickly, loosely cover with foil. - Cool and Finish
Cool in the pan for 10 minutes, then transfer to a wire rack. Once fully cooled, spoon cherry topping onto the custard centers.
Optional: dust edges lightly with powdered sugar.
Tips for the Perfect Vanilla Custard Yeast Buns
- Keep the dough soft: A slightly soft, elastic dough expands more evenly than a stiff one and helps prevent tearing around the filling.
- Weigh your portions: Dividing the dough into equal pieces ensures uniform baking and consistent shape.
- Chill the custard completely: Cold, firm custard sets at the same pace as the dough and keeps the center flat.
- Press the indentation twice: Press once after a short rest and again just before filling to prevent the center from rising during baking.
- Do not overproof: A short final rise limits excessive oven spring and helps the buns hold their shape.
- Use conventional heat, not fan: Gentle, even heat allows the dough beneath the custard to bake through properly.
- Bake slightly longer at lower temperature: This improves internal structure without overbrowning the surface.
- Add fruit after baking: Toppings stay fresh and defined when added to cooled custard.
- Let buns cool before finishing: Cooling allows the custard to set fully and prevents sliding or spreading of toppings.
Storage & Make-Ahead Tips
- Room Temperature: These buns are best enjoyed the day they are baked. Once completely cooled, store them loosely covered at room temperature for up to 24 hours. Avoid airtight containers, as trapped moisture can soften the crust.
- Refrigeration: Refrigeration is not recommended. Cold storage dries out the yeast dough and dulls the texture of the custard.
- Freezing: The baked buns (without cherry topping) can be frozen. Wrap each bun tightly and freeze for up to 1 month. Thaw at room temperature and refresh briefly in a low oven before topping.
- Make Ahead – Dough: The dough can be prepared a day in advance and refrigerated after the first rise. Chill overnight, then bring to room temperature, shape, fill, and bake the next day.
- Make Ahead – Custard: The custard can be cooked up to 48 hours in advance and stored covered in the refrigerator. Stir briefly before using to restore a smooth texture.
- Make Ahead – Cherry Topping: The cherry topping can be prepared up to 3 days ahead and kept refrigerated in an airtight container. Bring to room temperature before serving.
More Baking Ideas:
- Strawberries & Cream Cookies – Soft, buttery cookies infused with fresh strawberries and a velvety cream filling – the ultimate summer treat!
- White Chocolate Raspberry Cookies -Delight in the perfect balance of sweet white chocolate and tart raspberries with every bite of these irresistible cookies.
- Lemon Poppy Seed Cookies -These zesty lemon cookies with a hint of poppy seed crunch will brighten up your day with a refreshing burst of flavor.
- Lemon Cheesecake Cookies with Blueberry Curd – Bright, tangy, and irresistibly creamy, these Lemon Cheesecake Cookies with Blueberry Curd are a zesty delight topped with a luscious blueberry swirl. Perfect for citrus lovers looking for a sweet twist!
Watch the recipe video here. Let’s get to baking! Here is the full recipe:
Summary
Recipe Name
Author Name
Vanilla Custard Yeast Buns
Isabel
Published On