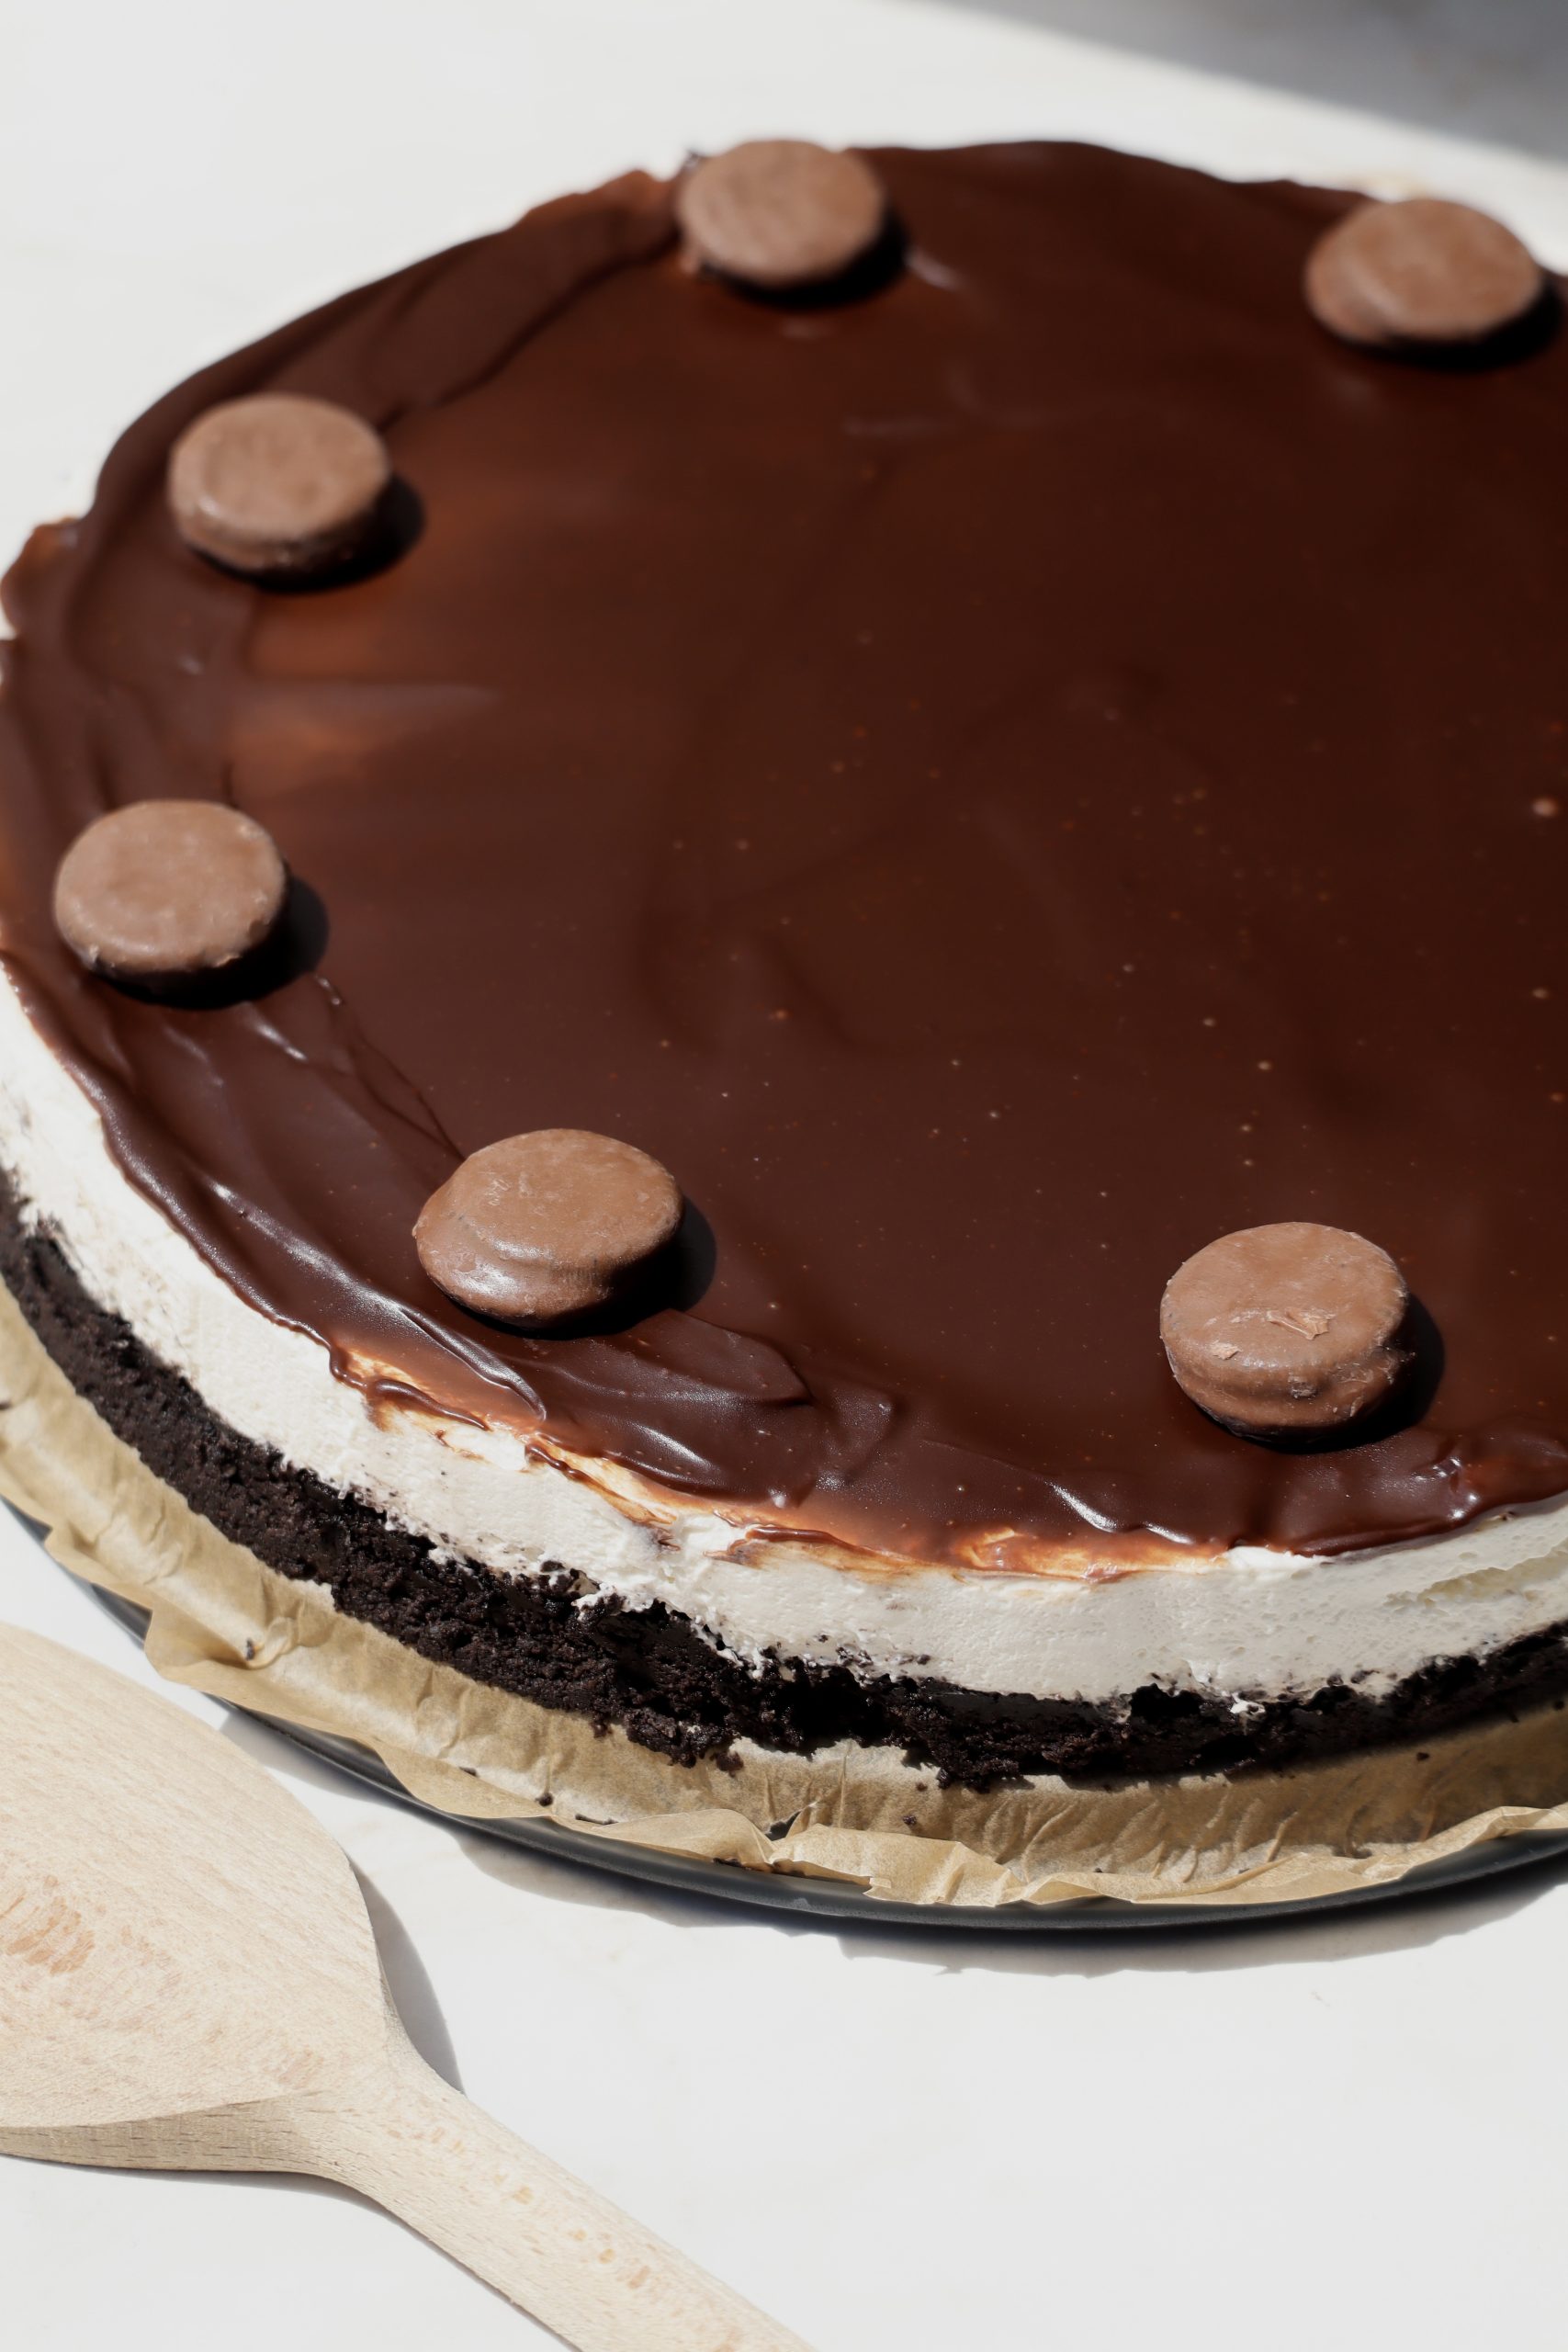

If you’re an Oreo lover looking for a no-fuss dessert that delivers maximum indulgence with minimum effort, this No-Bake Oreo Cheesecake is your dream come true. This creamy, chocolatey, and utterly delicious cheesecake requires no baking, no eggs, and just a bit of chilling time. With a crunchy Oreo base, a luscious cream cheese filling, and a rich dark chocolate ganache topping, it’s the ultimate crowd-pleaser.
Whether you’re preparing for a birthday party, a summer get-together, or just want to satisfy your sweet tooth, this no-bake Oreo cheesecake is perfect for any occasion. Let’s dive right into this foolproof, decadent dessert!
Why You’ll Love This No-Bake Oreo Cheesecake
- No oven required – Perfect for hot days or when you’re short on time.
- Ultra creamy texture – Thanks to Greek yogurt, cream cheese, and whipped cream.
- Loaded with Oreos – In the crust, the filling, and as a topping.
- Make-ahead friendly – Chill overnight and it’s ready to impress.
- Customizable – Add white chocolate, swap the base, or top with fresh berries.
Ingredients You’ll Need for the No-Bake Oreo Cheesecake:
For the crust:
- Oreo cookies: For the crunchy chocolate cookie base
- Melted butter: Binds the crushed Oreos into a firm crust
For the filling:
- Cream cheese: Creates a rich and creamy cheesecake texture
- Greek yogurt: Adds lightness, tanginess, and structure
- Heavy cream: Whipped for fluffiness and stability
- Powdered sugar: Sweetens the filling smoothly without graininess
- Vanilla extract: Adds warm flavor and enhances overall taste
- Agar agar or gelatin: Sets the filling without baking
For the ganache:
- Dark chocolate: Adds a rich, glossy chocolate topping
- Heavy cream: Melts the chocolate smoothly for a silky ganache
For decoration:
- Mini Oreos or crushed Oreos: Optional garnish for texture and visual appeal
For making the No-Bake Oreo Cheesecake, here are the essential tools you’ll need:
- Springform pan (20 cm / 8 inch): For shaping the cheesecake and easy removal after chilling
- Food processor or blender: To finely crush Oreo cookies for the base
- Mixing bowls (2–3): For mixing the filling, whipping cream, and preparing ganache
- Hand mixer or stand mixer: To beat cream cheese and whip the heavy cream
- Rubber spatula: For folding ingredients and smoothing the top of the cheesecake
- Small saucepan: To heat cream for ganache and dissolve agar agar or gelatin
- Kitchen scale: For accurate measurement in grams
- Measuring cups and spoons: For US measurements (cups, tbsp, tsp)
- Spoon or offset spatula: To press down the crust and spread ganache evenly
- Refrigerator: To set the cheesecake properly (minimum 4 hours)
Here is the full Recipe:
Ingredients:
For the base
- 300 g (3 cups) Oreo cookies
- 80 g (6 tbsp) melted butter
For the filling
- 200 g (¾ cup) cream cheese
- 250 g (1 cup) Greek yogurt, plain
- 200 g (¾ cup + 1 tbsp) heavy cream
- 50 g (½ cup) powdered sugar
- 2 tsp vanilla extract
- 1 packet agar agar or 1 sheet gelatin
For the ganache
- 100 g (⅔ cup) dark chocolate
- 80 g (⅓ cup) heavy cream
For decoration
- Mini Oreos or crushed Oreos
Directions:
1. Prepare the base
- Crush the Oreos (with filling) in a food processor or blender until fine.
- Mix in the melted butter until well combined.
- Press the mixture into the bottom of a 20 cm (8-inch) springform pan.
- Chill in the refrigerator while making the filling.
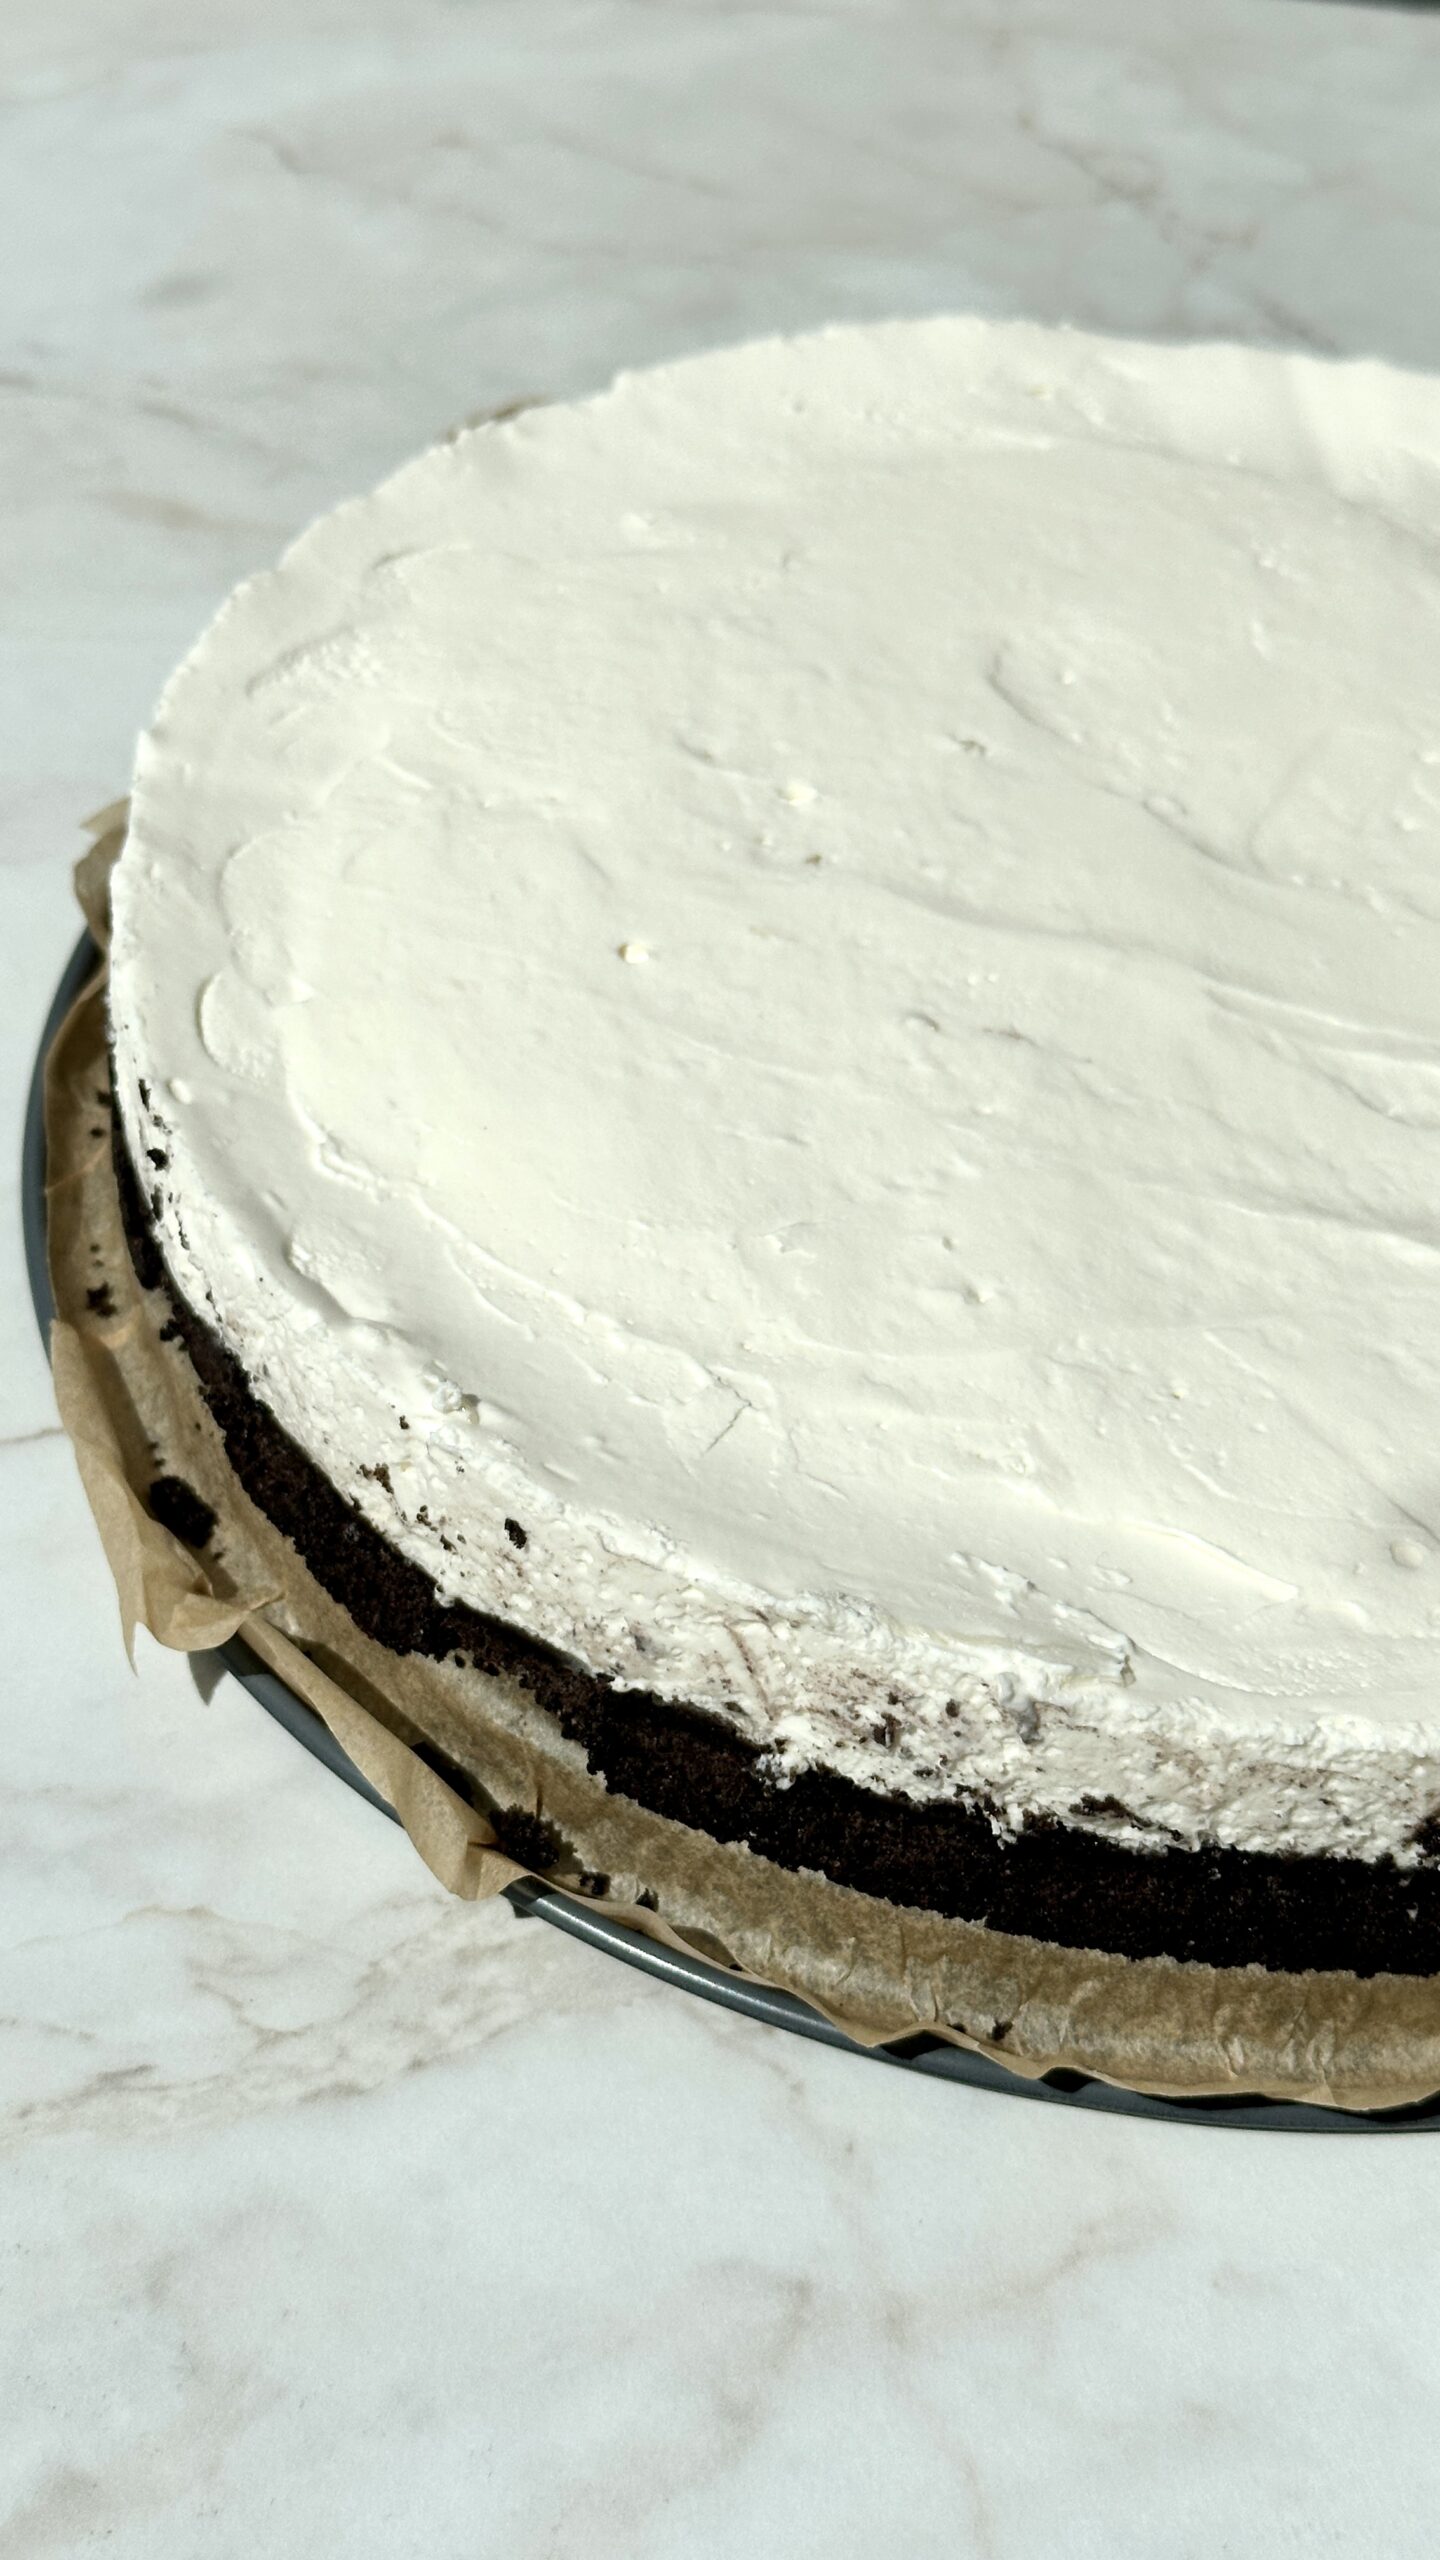
2. Make the filling
- In a large bowl, mix cream cheese, Greek yogurt, powdered sugar, and vanilla extract until smooth.
- In another bowl, whip the heavy cream until stiff peaks form.
- Fold the whipped cream gently into the cream cheese mixture.
- Prepare the agar agar or gelatin according to package instructions, then stir into the filling mixture.
- Pour the filling over the Oreo crust and smooth the top.
- Refrigerate for at least 4 hours or overnight.
3. Prepare the ganache
- Heat the heavy cream in a small saucepan until it just begins to simmer.
- Pour over the dark chocolate in a bowl. Let sit for 1–2 minutes, then stir until smooth.
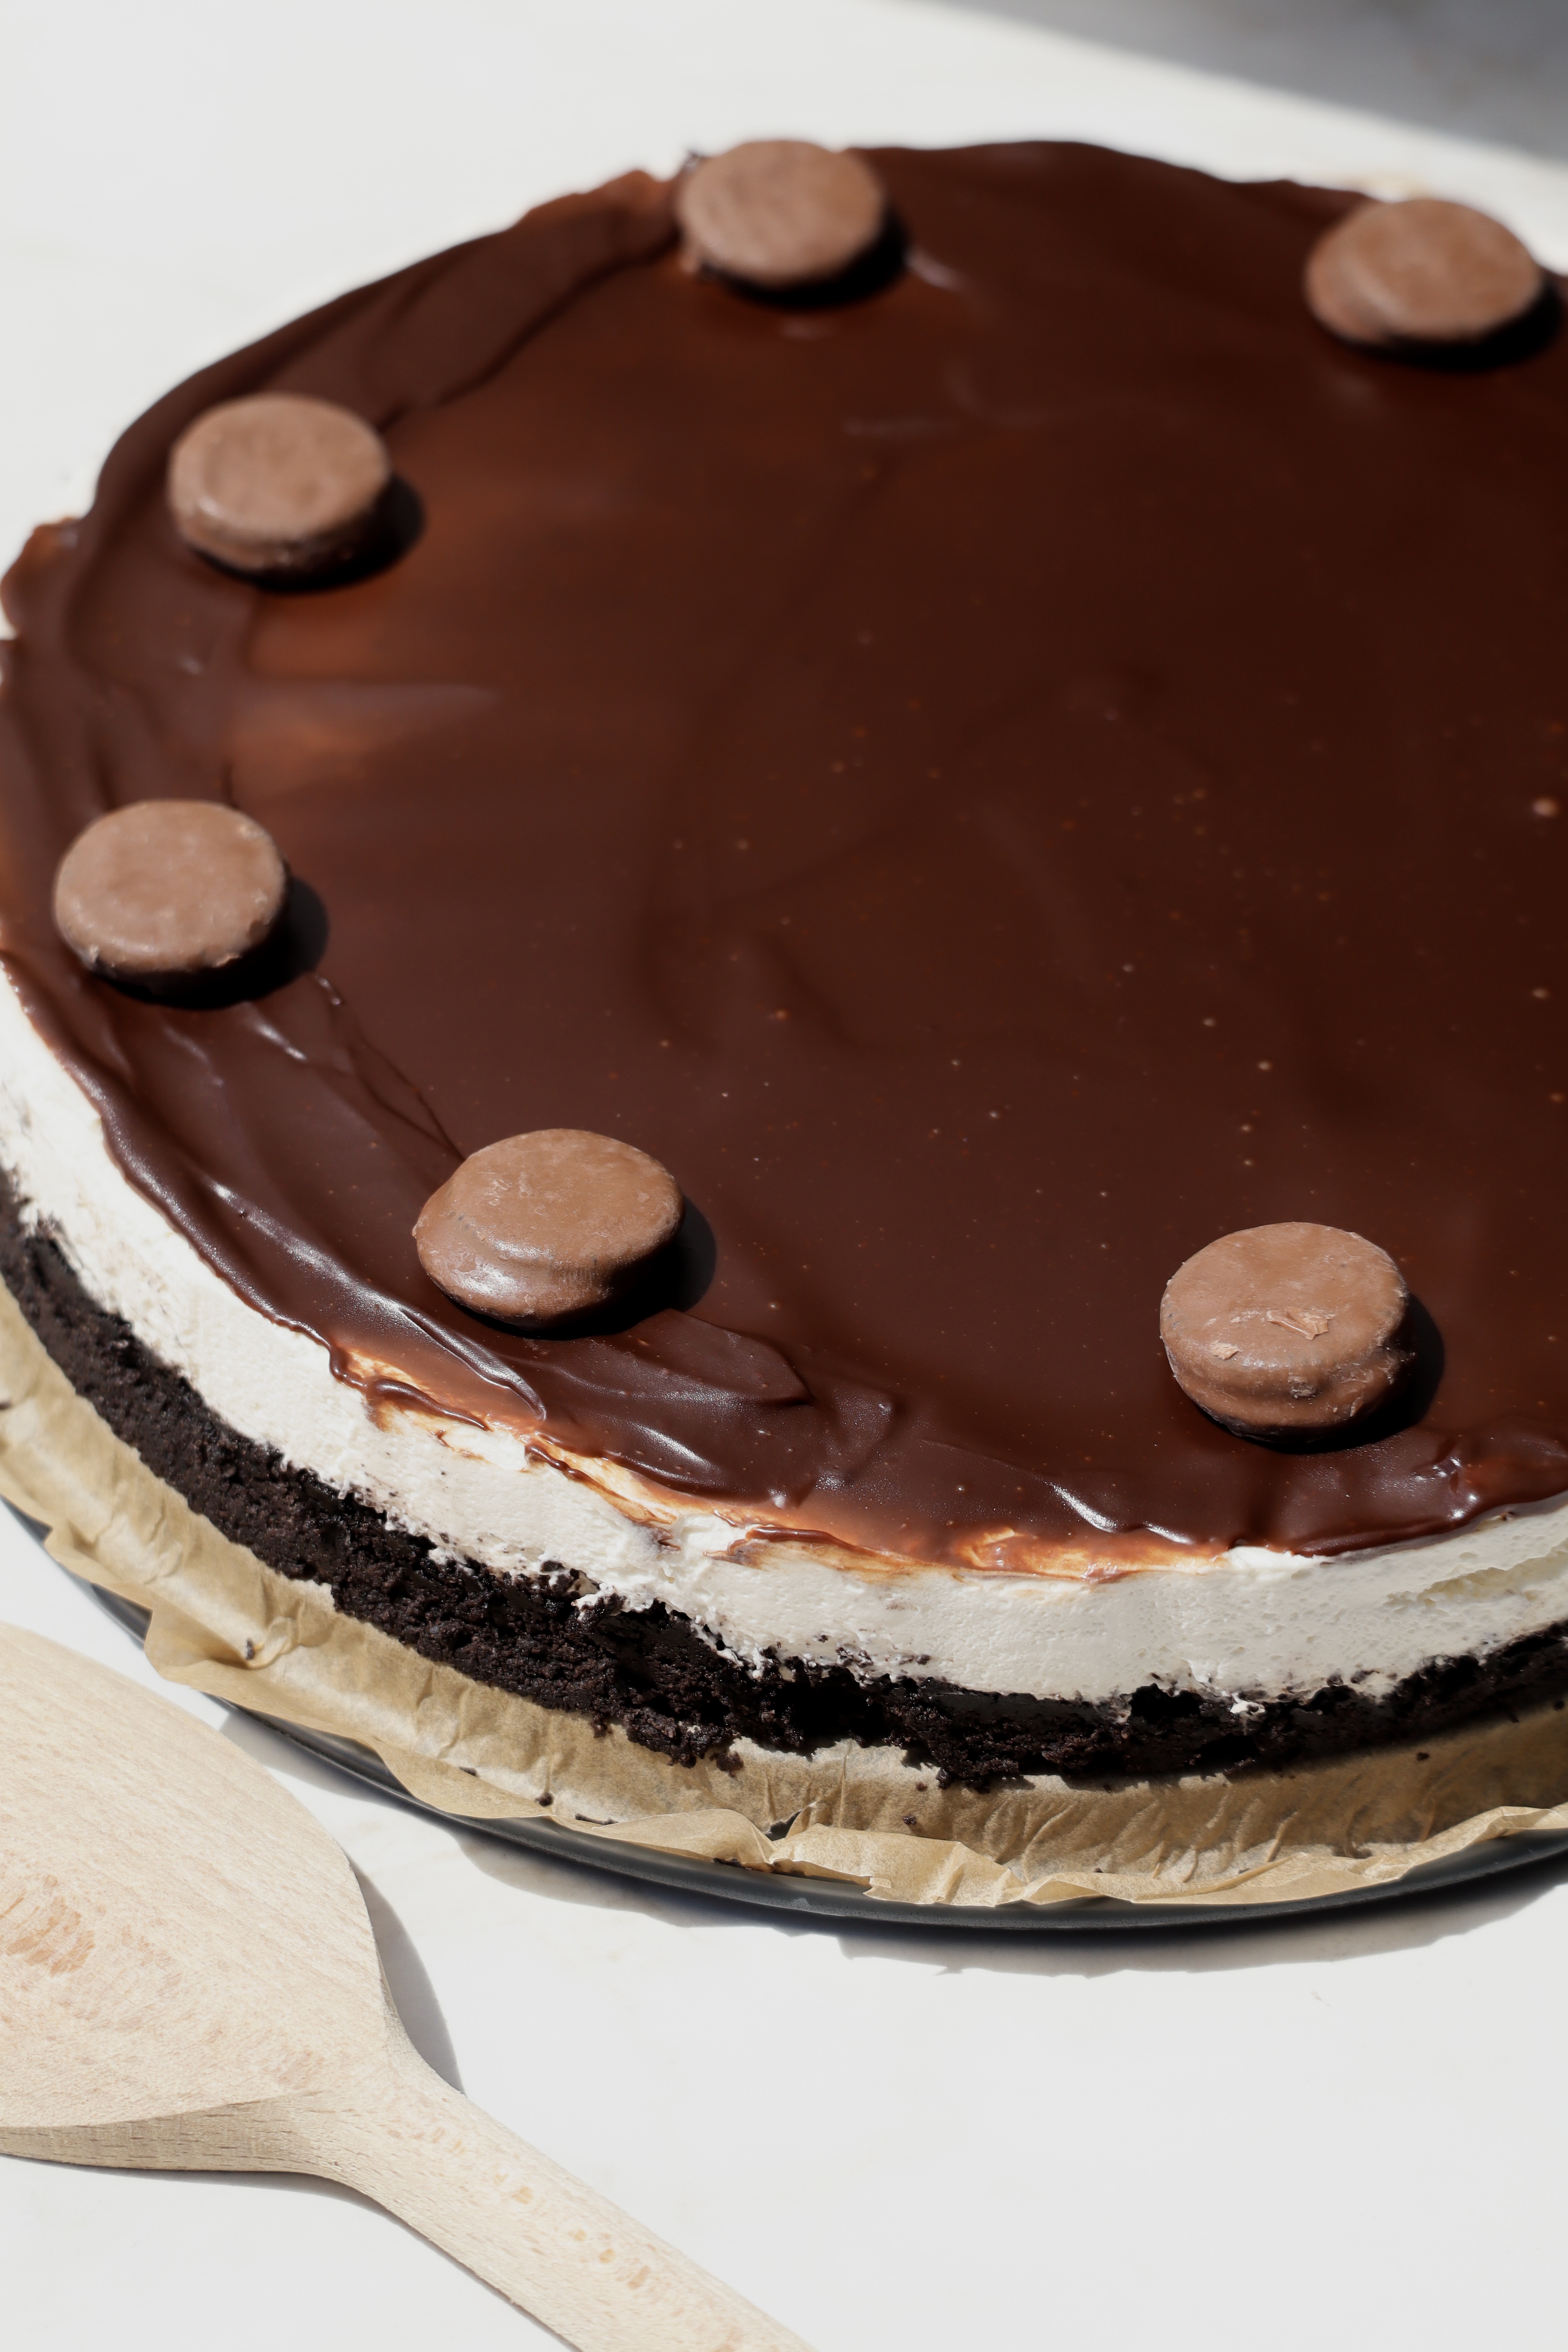
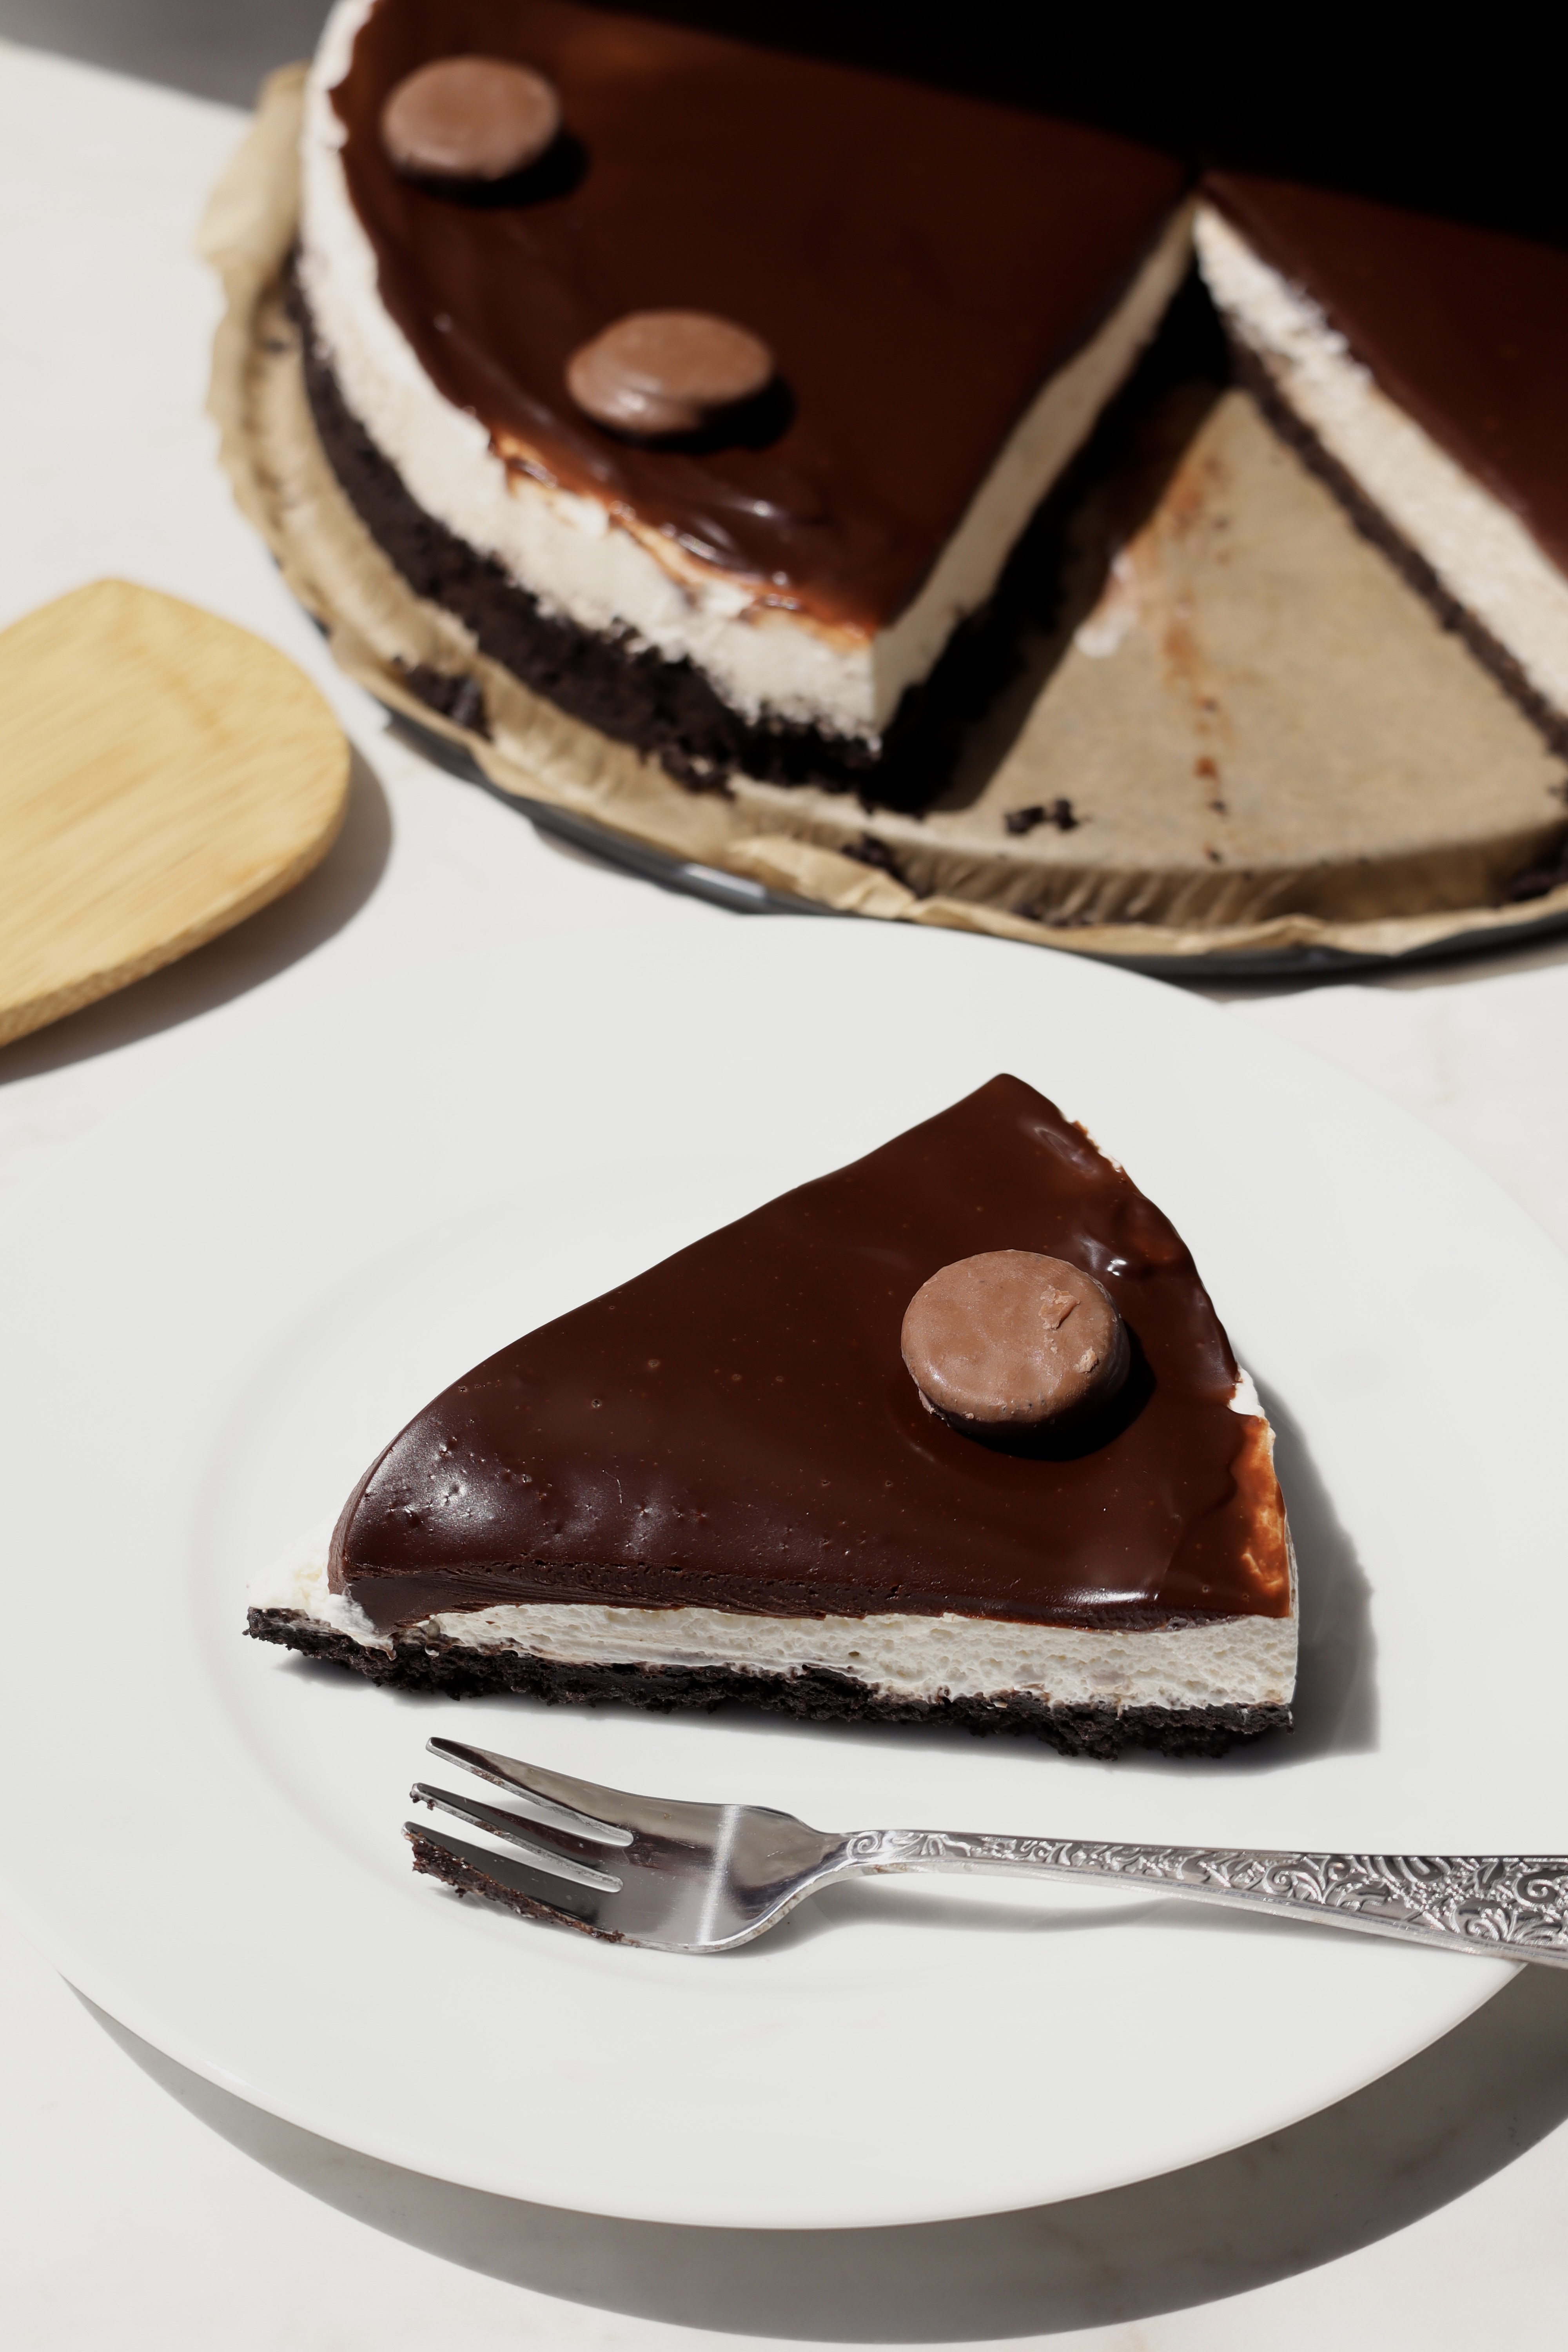
- Let cool slightly, then pour over the chilled cheesecake and spread evenly.
4. Decorate
- Chill again for 30 minutes to set the ganache.
- Top with mini Oreos or crushed Oreos.
Variations and Customizations
- White Chocolate Version: Add melted white chocolate to the filling for a sweeter twist.
- Peanut Butter Swirl: Mix in a few spoonfuls of peanut butter to the cheesecake mixture.
- Mint Oreo Cheesecake: Use mint-flavored Oreos for a fresh spin.
- No ganache? Top with whipped cream or a berry coulis instead.
Storage
- Keep refrigerated and consume within 5 days.
- Freeze individual slices if desired, and thaw in the fridge before serving.
Tips for Success
- Use full-fat ingredients: Low-fat cream cheese or yogurt may result in a runny filling.
- Don’t skip the chilling: The longer it chills, the firmer and more flavorful it becomes.
- Room temperature cream cheese: This helps avoid lumps in your filling.
- Make it gluten-free: Use gluten-free Oreos or chocolate cookies.
Final Thoughts
This No-Bake Oreo Cheesecake is the ultimate dessert for chocolate lovers, Oreo fans, and anyone who wants to impress guests without breaking a sweat in the kitchen. It’s rich, creamy, and chocolatey, with just the right balance of sweetness and tang.
Whether you’re hosting a party, making a birthday dessert, or simply treating yourself, this no-bake cheesecake will quickly become your go-to recipe.
More Baking Ideas:
- Strawberries & Cream Cookies – Soft, buttery cookies infused with fresh strawberries and a velvety cream filling – the ultimate summer treat!
- White Chocolate Raspberry Cookies -Delight in the perfect balance of sweet white chocolate and tart raspberries with every bite of these irresistible cookies.
- Lemon Poppy Seed Cookies -These zesty lemon cookies with a hint of poppy seed crunch will brighten up your day with a refreshing burst of flavor.
- Lemon Cheesecake Cookies with Blueberry Curd – Bright, tangy, and irresistibly creamy, these Lemon Cheesecake Cookies with Blueberry Curd are a zesty delight topped with a luscious blueberry swirl. Perfect for citrus lovers looking for a sweet twist!
Watch the recipe video here. Let’s get to baking! Here is the full recipe: